Appearance
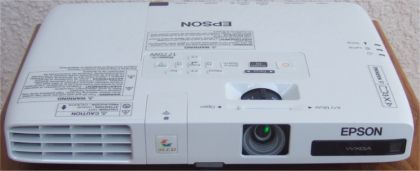
With its very low profile and small footprint, the 1775W has a sleek appearance. The 1775W has its lens slightly right of the center of the projector when facing it. There a manual, sliding lens cover, adjustable from the top of the projector, that protects the lens when not in use and also provides video and audio mute (A/V Mute) when the projector is in operation. When accessed from the remote, A/V Mute does the same without closing the cover and also allows for display of a blue screen or alternate screen (such as company logo). A/V Mute also allows for a pause for questions during a presentation while helping to save lamp life. Right behind the A/V Mute lens cover switch is a recessed control for lens zoom. To the right of the lens, on the front panel, is an IR receiving eye and a sensor that is used by the “Screen Fit” feature to automatically adjust the displayed image. To the left of the lens is a cover for the wireless network module which supports 802.11 a/b/g wireless protocols. The module is easily installed by removing a single screw on the bottom of the cover, plugging in the module and replacing the cover. There is also an indicator light on the cover that shows when the wireless module is in operation. Finally, of the left side of the front panel is an exhaust vent. Height adjustment is obtained via a push button, adjustable foot in the center front of the 1775W. The rear corner feet are adjustable as well.
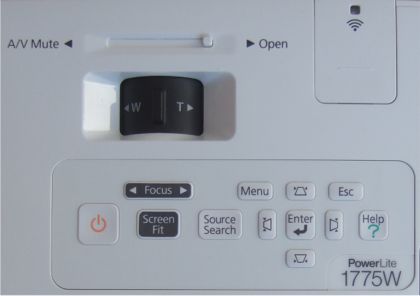
On top of the projector, just behind the lens zoom control, there is a nicely laid-out control panel with the most important controls of the remote, including power lens focus. There are buttons for Source Search, Menu, Navigation, Escape, and Enter. The menu navigation buttons double as adjustment buttons for vertical and horizontal keystone adjustment. Lastly, there is a Help button (also on the remote) which Epson has offered on previous models as way to solve simple problems that may occur in use, without having to stop and consult the manual. Pushing this button brings up some questions designed to narrow down the problem. The Help function then takes you directly to the appropriate section of the menu to address that problem.
Indicators for Power, lamp status and temperature (if overheating) are along the right top edge of the projector. To the left of the control panel is the cover for access to the lamp. Having the cover on top of the 1775W allows for easy access even if the projector is ceiling mounted. The screw to release the cover is on the rear of the projector. There is an intake vent and air filter on the right side of the projector, near the front. The air filter can be vacuumed in place or removed from the bottom of the projector for more thorough cleaning. Fortunately, the filter is so small that it could likely be easily removed even if the projector was ceiling mounted.
Moving to the rear panel, there are connections for the power cord, a composite video input and a standard computer input for a VGA cable. These are followed by two USB connectors, a standard Type A for a USB thumb drive and a Type B that is used for connection to a computer to output video over USB to the 1775W. Following those is and HDMI input and a 1/8” mini stereo jack that can be used as either an audio input or output. To the right of that is a second IR receiving eye and a Kensington lock port.
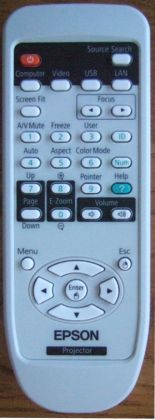
Epson Powerlite 1775W Remote Control
The 1775W’s remote is well laid out, allowing easy access to the most used functions. An on-screen pointer can be brought up by a button push on the remote and then moved around with the arrow keys. Similarly, other buttons change inputs, access the Help function, control the electronic zoom, presentation pages and speaker volume. If external speakers are connected to the audio out, the remote’s volume control will control them as well. Also, as previously mentioned, there are buttons for power focus on the remote.
The buttons are not backlit, but that can be distracting during a presentation where the remote may be in constant use. As was the case with the 1735W we previously reviewed, the buttons for the most of the functions are all the same size and color, making it difficult to locate them in anything but a fairly well-lit room. Fortunately, the Menu and menu navigation buttons are separated from the rest on the bottom third of the remote, making them easy to access in a darkened room.
 Click Image to Enlarge
Epson Powerlite 1775W Setup & Menus
The Epson Powerlite 1775W starts up very quickly (and has instant shut down as well), projecting a readable image on the screen in a few seconds. Placement is a bit touchy, as the short-range 1.2X zoom doesn’t give you much flexibility in the distance the projector can be placed from the screen. Some competing LCD projectors have much greater zoom ranges, but then they aren’t as compact as the 1775W. Also, the 1775W has a slight negative offset. This means that the bottom of the projected image is slightly below the center of the lens when table mounted. So, to avoid keystone correction, the projector must be placed on a table that’s higher than the bottom of the screen. Fortunately, the 1775W has an auto-keystone correction feature called “Screen Fit”. This uses a sensor on the front of the projector to determine the image alignment. By pushing the “Screen Fit” button and making a quick zoom adjustment, the image is displayed square to the screen. We tried this with a typical amount of front height adjustment and found it to work very well, with minimal distortion on the image edges. On the plus side, if you do have a high enough table, the front and rear adjustment feet makes it easy to level the projector. Once the display size and position are properly set up, the 1775W can be power focused from the remote. This is a nice feature of the 1775W that is not found in the other 1700 series projectors, or many other projectors in this price range.
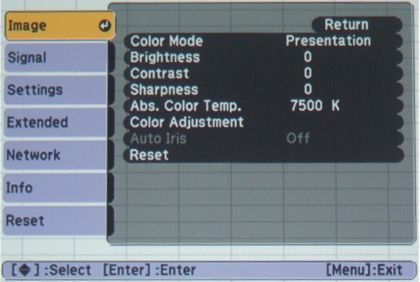
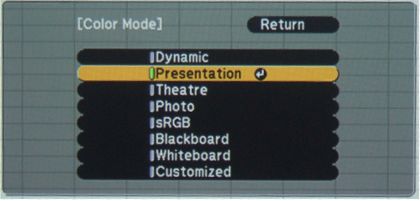
As we noted with the previously reviewed 1735W, Epson has kept its menu system pretty much the same over the years, with differences relating to newer features. As always, the menus were well organized, and easy to navigate. You simply bring up the menu; select the Image menu and the appropriate Color Mode (Dynamic, Presentation, Photo etc.) for your presentation. From there you can also make the usual adjustments for Contrast, Brightness and Sharpness, but the 1775W’s default settings will be more than adequate for most presentations. The number of adjustments available depends on the particular Color Mode chosen. For those who want to create their own color mode, the Customized mode allows for every available adjustment.
The Epson only has a single stereo input/output, but you can toggle its function between using it as an input to the internal speaker, or as an audio output, to feed an external audio system. As the 1775W only has a one watt built-in speaker, you will need to use an external audio system for all but the smallest rooms.