Projector Reviews Images

JVC DLA-RS10 - Physical Tour

Posted on October 10, 2013 by Art Feierman

JVC DLA-RS10 Physical Appearance

A large portion of this section on the JVC DLA-RS10, is right out of the review of the RS20. The two projectors are almost identical, as far as these criteria go. Of note, and covered below, is one difference in the number and types of inputs, and also, the RS10 lacks some options found on the RS20, in terms of features.

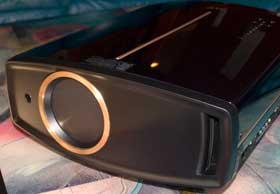
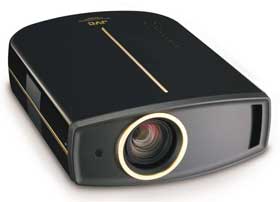
The JVC RS10 sports clean lines, black piano finish and a little gold trim make for a physically very attractive projector. The motorized lens is recessed, and mounted slightly offset to the left of center. An infra-red sensor is just to the left of the lens. The control panel is on the top toward the rear (toward the right side if looking from the front), and the inputs are located low on the right side (looking from the front). Watch out! The IR sensors on the front and back are covered by some almost clear plastic. It's almost impossible to notice the plastic. If you don't remember to remove it, it definitely harms the range of the remote control.

The projector can be shelf or ceiling mounted.

The total depth is just under nineteen inches and it is about fourteen and a half wide. It's height is just over six and a half inches. A motorized door keeps dust off the lens, by closing when the JVC RS10 is powered off. There are adjustable front and rear feet.

The inputs are located on the right side (viewing from the front), just above the bottom. This is a plus for many who shelf mount as they don't need a few extra inches for connectors and cabling coming out of the back. For those ceiling mounting, well, I guess it depends which side of the projector faces people with the lights on.

The lamp gets replaced from a removable panel in the center of the back of the projector. No need to unmount the RS10, if you are ceiling mounted, unlike a number of projectors who have their lamp doors on the bottom, covered by a ceiling mount.

Control Panel

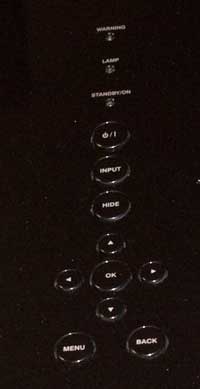
The RS10's control panel is located on the top, and is identical to the RS20's. In the image on the right you are viewing the panel from the back of the projector. The three indicator lamps are closest to the front of the projector. They are: Warning, Lamp, and Standby/On.

Further back is the first button, the Power switch. It's the usual press once for on, press twice for off. Next is the Input button, followed by a Hide button to black out the image.

Then comes the four arrow buttons in a diamond shaped arrangement, with a larger Enter button in the center.

Lastly, side by side, are the Menu, and (menu) Back button. Pretty standard stuff. Of course, we all primarily rely on the remote control, and probably only use the control panel during initial setup, if at all.

Input/Output

Located on the side, from front to back, first there are two HDMI 1.3b compatible inputs. Missing from the DLA-RS10 and HD350, but found on the RS20 and HD750 is a computer input. For some reason, the RS10, like my older RS1 does not offer an analog computer port.

Next up are three RCA connectors for the component video input, followed by another RCA connector for basic composite video. Next is the S-Video input, followed by the RS-232 connector for controlling the projector directly from a computer or room controller. Finally, there is a 12 volt screen trigger for controlling a motorized screen or masking system.

All considered that's a fairly standard complement of inputs and outputs. Except for the lack of a computer input, no surprises.

As to handling a computer input, there are some work arounds. Depending on the graphics card and design of the computer output, you may be able to push your computer signal across to the component video port. That will work for some.

Going digital is probably the better alternative. I'm a MacBook Pro user, and I've simply been outputting HDMI (actually it's technically a DVI port on the Mac), directly into my RS1, and the same works for the RS10.

If hooking up a computer is important to you, definitely discuss this with the dealer you are planning to buy your JVC from.

JVC DLA-RS10 Menus

I do like the menu layout. That said, as with the RS20, the remote can make life difficult, as it's range is limited... But I'll discuss that below.

Most of the image goodies are found on the Picture menu, which is the first main menu the top right when the main menu is open. Besides the usual Brightness, Contrast, Color Saturation, etc., the Picture menu has a Gamma sub menu, and and Advanced sub-menu (which has sharpness, and the all important CMS (color management system). More to follow. I've got images to add, and with them some descriptions. Stay tuned.

JVC DLA-RS10 Remote Control

I'm not fond of this remote control The older one that came with my JVC RS1. That remote felt better, in that the buttons had better action. I find myself pressing, not hard enough, or down at the wrong angle, requiring me having to press again. The range is a bit limited, or at least if you are bouncing the signal off of your screen, you'll have to have the angle about right on.

The backlight is good, with a a brownish yellow color(which doesn't sound inviting, but does look good), with the black labels on the buttons, making it easy to read.

Quicktip: Watch out! The IR sensors on the front and back of the RS10 are covered by some almost clear plastic. It's almost impossible to notice the plastic. If you don't remember to remove it, it definitely harms the range of the remote control. Even once removed, the range and angle could be better, but it's a near disaster with them covered.

Overall, the buttons are well organized and fairly well spaced. The buttons are of decent size. At the top are two power buttons. On the right is Power On, and on the left, is Standby (power off). You press Standby twice to power down.

The next pair are Lens (brings up the Lens focus, zoom, and shift controls), and Input.

Below those two are the Info button, Lens AP (aperture) for the manual iris, and on the right, Aspect ratio selection.

Next come eight image controls, including: Gamma, Color Temp, Color saturation, Tint, N.R. (noise reduction), Brightness, Contrast, and Sharpness.

Right above the four arrow keys in a round arrangement, are a Test button (toggles between test patterns) and a Hide button to black out the image.

In the center of the four arrow keys is a very large enter button. Below the arrow keys are the Menu button on the left, and Back button on the right.

There are 8 buttons for the modes, toward the bottom, Cinema 1, 2, Dynamic, etc. Three of the buttons are for your user defined modes User 1,2,3.

In the JVC RS20 review I was perplexed as to why the remote control didn't have a mode button for THX, a mode not found on the RS10. Well, I've figured it out: One remote for both projectors, so, since the RS10 lacks that mode, JVC decided to skip it on the remote.

No loss for RS10 owners, but an inconvenience for RS20 users.

Finally! the last button, a wide thin one is the backlight button. It's in a good place. Since the remote itself is very dark, it's nice that the Light button glows slightly in the dark.

JVC's remote control has a very good layout, but overall, it's not bad, but not great, either!

Click Image to Enlarge

Latest Reviews

February 25, 2024

Introducing the Hisense C1: A cube-shaped 4K UHD lifestyle projector with an RGB triple laser light source and integrated JBL ...

February 19, 2024

The BenQ X3100i is a 4LED, 4K UHD (3,840 x 2,160p) 0.65" DLP short-throw gaming projector that offers a BenQ-rated ...

© 2024 Projector Reviews

crossmenu linkedin facebook pinterest youtube rss twitter instagram facebook-blank rss-blank linkedin-blank pinterest youtube twitter instagram