Projector Reviews Images

JVC DLA-X70R Physical Tour 2

Posted on March 27, 2012 by Art Feierman

Menus

JVC has modified the menu of the X70R, compared to last year.

JVC DLA-X70R Menus

Picture Adjustment Menu

There is now a Picture Mode, and below it a Color Profile. JVC has added a Dark Bright level control, and a Picture Tone.

Unlike the lower cost X30 and RS45, this X70R has a THX mode, which is discussed elsewhere.

Besides the usual Brightness, Contrast, Color Saturation, etc., the Picture menu has a Gamma sub menu, and and Advanced sub-menu.

Picture Adjustment - Advanced Sub-menu

Offers control of sharpness, noise, full color management, the lenses manual iris, and lamp power, and, I almost forgot CFI for smooth motion, which JVC calls Clear Motion Drive. I wish I could tell you what MPC stands for, or what it does, but the manual seemed to overlook this feature. I can say different modes have different defaults, and it does seem to add some edge sharpening, but what it really is doing, I'm not sure. I don't believe it is part of e-Shift, but I'm still trying to find out, with a request in to JVC.

Color Temperature Sub-menu

This menu is the Color Temp menu for doing the basic grayscale adjustments. The DLA-X70R, lacks a full CMS - color management system. (The more expensive JVC's, as well as all of the direct competition do offer a full CMS.)

Custom Gamma Sub-menu

Not only can you adjust the gamma of white, but also you can do each primary color separately. Further, the JVC X70R comes with Normal, and 4 additional gamma presets, plus it allows you to save three of your own custom settings. Note also, that when doing so you can adjust each IRE point separately.

I also like the grayscale provided on the screen (lower right), which gives you a good idea if you are crushing blacks or whites too much, or expanding them the way you want. A great Gamma control.

Input Signal Menu

Here you'll find options for the HDMI 1.4 input ports, the ability to picture shifting (Picture positioning - digitally move the image up or down (useful for some with cinemascope movies on 16:9 screens, in case you want all the letterboxing to be at the top, and the movie, flush with the bottom of your screen).

The X70R offers Masking, which I favor over overscan, as it maintains 1:1 pixel mapping, if you have to eliminate to fringe noise around the edge of your signal (not uncommon with TV).

3D Settings Sub-menu

Including a choice of Off/On, 2D to 3D conversion, and a control for reducing crosstalk (ghosting) which I never spent enough time with to get the hang of, but it doesn't seem to do a whole lot in terms of improving existing ghosting.

Installation Menu

Installation settings: The Lens Control menu is extensive. You've got the ability to control motorized focus, zoom, and lens shift. There's a black and green lined test pattern that comes up when adjusting.

The Lens Memory allows you to set up the projector to project two different sized images from the same physical location. The assumption here, is that you use a "Cinemascope" wide screen, such as my 2.35:1 aspect ratio screen.

With one setting of Lens Memory, the projector fills my 124" wide screen (2.35:1). In the other setting I "set up", the image gets smaller, and fills the height of my screen with a 16:9 image, leaving the letterbox on the left and right. (Without zooming out (smaller), 16:9

Lens Control Sub-menu

Here you can access the individual controls for Focus, Zoom and Lens Shift. (or you can do that from the remote with the Lens Control Button which toggles you through those three controls.

The Lens Memory controls to save, and select are near the bottom. You can also assign names to the Lens Memories, such as 2.35:1 Movies, or Sports, or whatever "floats your boat".

There is also a Lock feature that's handy, and prevents casual changing of the settings.

Sharpness Sub-menu

The Sharpness sub-menu offers both Sharpness and Detail Enhancement controls which are discussed elsewhere in this review.

Clear Motion Drive on Menus

CFI - Creative Frame Interpolation - called Clear Motion Drive by JVC, offers a number of settings. 1 and 2 seem to have a lot of judder or shake on 24fps movies. Ultimately I found the 3 and 4 settings to be the most usable. I didn't find any CFI that I really liked for movie viewing, but I left the Clear Motion Drive on 3 for a lot of March Madness basketball!

Display Setup Menu

The Display Setup menu is pretty boring compared to the others, and mostly very obvious features that I won't need to cover!

Function Menu

This allows you to set up the Screen Triggers (or for controlling an anamorphic lens sled) The command and control serial port, a simple timer (One to four hours) - I don't believe it is smart - that the projector will shut down for lack of an input.). I'm used to setting most projectors to shut down if they don't have an input. Unfortunately I put a bunch of extra hours on the lamp, one late night, forgetting to shut off the projector after shutting off the sources. About 16 hours later I was ready to fire up the JVC, only to realize it was still running.

As is pretty much standard on home theater projectors, lastly is an Information menu, (not shown here), which displays items such as resolution, which port is being used...

Remote Control

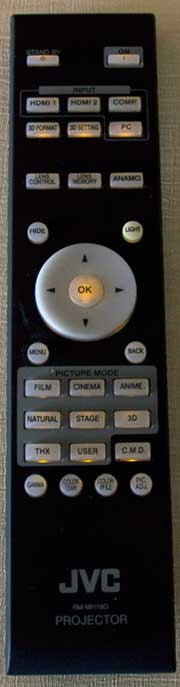
I love the feel (and operation) of the JVC remote control for the DLA-X70R - and DLA-X30.

This one is a bit different than the remote from my own RS20, a remote design they had used for years. This one has a nicer case feel to grip, a "perfect" backlight, (when it comes to not being too dim, or too bright), good range, and a well thought out layout.

Basically:

Two power buttons near the top. On on the right, and Off to the left.

Then come two rows of buttons, the first row of three, offers the primary inputs, your HDMI 1 and 2, and a Component video. That's great, as few will be using other inputs, so not really a need, say, for S-video on the remote.


Next row - two small round buttons, one is a Hide feature, the other is the backlight button.

Then comes the arrow keys and navigation in a round configuration, with a center OK (Enter) button. Below the ring, are Menu and Back, two more small round buttons.

Further down, are nine more buttons in 3 rows, each sporting a different Picture preset like THX, User, or Cinema, and also CMD (CFI for smooth motion)

That leaves only the last four buttons at the bottom of the JVC DLA-X70R, and, from left to right, they provide direct access to controls for:

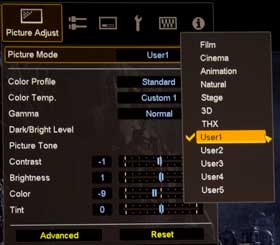
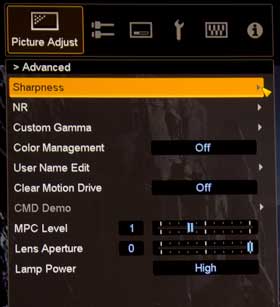
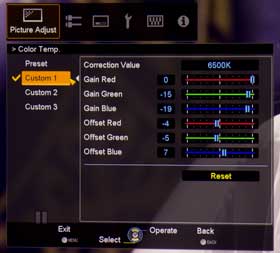
Gamma, Color Temperature, Color Profiles, and Picture Adjust which toggles you through all the usual controls like brightness, contrast, sharpness...

Despite the claim of only 7 meters (about 22 feet) max range, we found the X70R remote to do much better, even beating a30 foot total range, including a bounce off of my Studiotek 130 screen. Nice!

Remotes don't get much nicer than this. Looks good, feels good in your hand, balances well... Love it!

Click Image to Enlarge

Latest Reviews

February 25, 2024

Introducing the Hisense C1: A cube-shaped 4K UHD lifestyle projector with an RGB triple laser light source and integrated JBL ...

February 19, 2024

The BenQ X3100i is a 4LED, 4K UHD (3,840 x 2,160p) 0.65" DLP short-throw gaming projector that offers a BenQ-rated ...

© 2024 Projector Reviews

crossmenu linkedin facebook pinterest youtube rss twitter instagram facebook-blank rss-blank linkedin-blank pinterest youtube twitter instagram