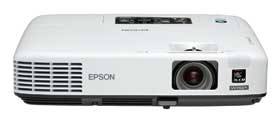
Appearance
The 1735W has its lens offset to the right side of the projector when facing it. There a manual, sliding lens cover, adjustable from the top of the projector, that protects the lens when not in use and also provides video and audio mute (A/V Mute) when the projector is in operation. When accessed from the remote, A/V Mute does the same without closing the cover and also allows for display of a blue screen or alternate screen (such as company logo). This allows for a pause for questions during a presentation while helping to save lamp life. Right behind the A/V Mute lens cover switch are recessed controls for lens focus and zoom. There is also an IR receiving eye and an exhaust vent on the front panel.
Height adjustment is obtained via a push button, adjustable foot in the center front of the 1735W, and two screw feet in the rear corners.
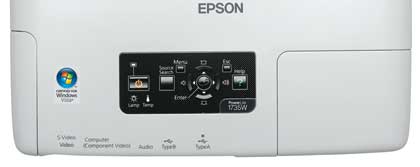
On top of the projector, toward the rear, there is a nicely laid-out control panel with the most important controls of the remote, plus indicators for the lamp and temperature (if overheating). There are buttons for Source Search, Menu, Navigation, Escape, and Enter. Lastly, there is a Help button (also on the remote) which Epson has offered for many years as way to solve simple problems that may occur in use, without having to stop and consult the manual. Pushing this button brings up some questions designed to narrow down the problem. The Help function then takes you directly to the appropriate section of the menu to address that problem.
To the right of the control panel is the cover for access to the lamp. Having the cover on top of the 1735W allows for easy access even if the projector is ceiling mounted. To the left of the control panel is the cover for the wireless network module which supports 802.11 a/b/g wireless protocols. The module is easily installed by removing a single screw on the cover, plugging in the module and replacing the cover. There is an intake vent and air filter on the left side of the projector, near the front. The air filter can be vacuumed in place or removed for more thorough cleaning.
Moving to the rear panel, you'll find the inputs, which are discussed below.
Our previous Epson 1815p review mentioned the lack of a digital input (DVI or now HDMI), as some computers have these outputs available. There is still no digital video input on the 1735W, but it’s not really necessary on a multimedia projector, especially in this price range.
Control Panel
On top of the projector, toward the rear, there is a nicely laid-out control panel with the most important controls of the remote, plus indicators for the lamp and temperature (if overheating). There are buttons for Source Search, Menu, Navigation, Escape, and Enter. Lastly, there is a Help button (also on the remote) which Epson has offered for many years as way to solve simple problems that may occur in use, without having to stop and consult the manual. Pushing this button brings up some questions designed to narrow down the problem. The Help function then takes you directly to the appropriate section of the menu to address that problem.
Input/Output
On the back of the 1735W, there are connections for the power cord, video inputs for composite, S-video and component/computer video via a mini D-sub HD15 connector for a VGA cable, a DVI to VGA connector (which allows for plug-and-play compatibility with Macs) or component to VGA connector.
There is also a 1/8” mini stereo jack that can be used as either an audio input or output. There are two USB connectors, a standard Type A for a USB thumb drive and a Type B that is used for connection to a computer to output video over USB to the 1735W. Below these connectors is a second IR receiving eye, a built-in speaker and a Kensington lock port. As noted earlier, the Epson does not have a digital input (HDMI or DVI), however, that feature is not commonly found on lightweight portable projectors.
Menus
Epson hasn't made many changes to its menu system in the last five plus years. In fact, they pretty much look the same, with the primary differences relating to newer features. This is a good thing, as their menus have always been well organized, and easy to navigate. Below are several images from the "main menus" plus three more from the Networking menus.
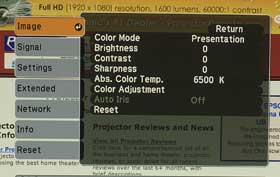
To the right is the Image menu. The other main menus are visible down the left and can be selected by a point and click. The Image menu has most of the key feature controls that related to picture quality, brightness and color control.
There is a color adjustment sub-menu, not shown, and of particular note, to those who wish to double the 1735W to watch movies and TV at home, you'll note a grayed out Auto Iris feature. That feature is only available when the Theatre mode is selected.
Game mode is the brightest, and should be used when you need every last lumen to fight bright room lighting. It's actually pretty good, but the slightly less bright Presentation mode will be the one most people use.
Note, there are also specific modes for photo work, text, the sRGB color matching standard, and even a Blackboard mode, designed for when you present on darker surfaces (such as green and black boards.
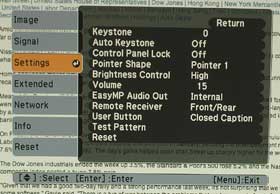
The Settings mode, contains some useful and interesting controls. Of note, the auto keystone feature (which for presentations with small type, we recommend off). Epson provides a pointer system (nice touch) which is operated from the remote. Different pointer shapes can be selected here. The lamp brightness control lets you toggle between Bright and a lower power mode.
Since the Epson only has a single stereo input/output, you can toggle here between using the internal speaker or making it an audio out, to feed an external audio system. When doing so, the audio originates from the USB, or wireless sources.
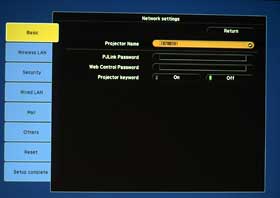
Doing a basic setup of the wireless presentation mode is pretty straightforward, with a place to select your network and insert password.
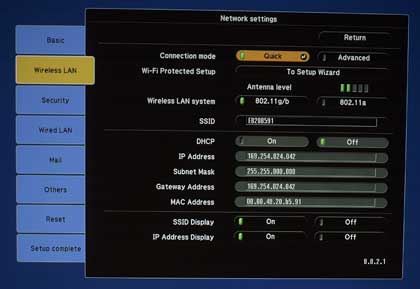
For your consideration below, there are two more images of the networking menus. The first is the full blown wireless network configuration.
Remember, for the most part, wireless can be setup to work rather effortlessly, using the USB drive provided for your computer, or, alternatvely with the EasyMP software (also provided), when you need best/fastest video.
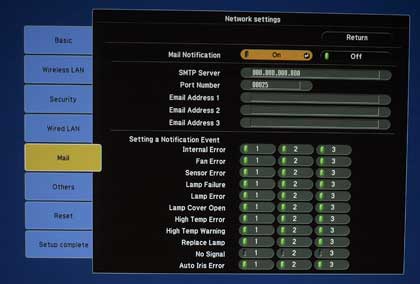
Below that menu, is the network menu for notifications. Setting this up allows the projector to notify administrators of malfunctions, filter and lamp issues
As you can see, there are a number of additional networking menus. That's not surprising, as this projector is about a capable on wired, or wireless networks as most projectors several times the size and cost.