menu picture mode
user 1
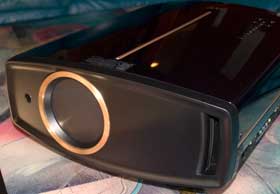
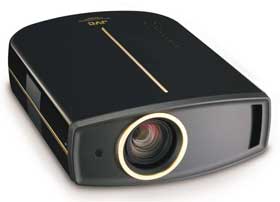
Clean lines, black piano finish and a little gold trim make for a physically very attractive projector. The motorized lens is recessed, and mounted slightly offset to the left of center. An infra-red sensor is just to the left of the lens. The control panel is on the top toward the rear (toward the right side if looking from the front), and the inputs are located low on the right side (looking from the front). Watch out! The IR sensors on the front and back are covered by some almost clear plastic. It's almost impossible to notice the plastic. If you don't remember to remove it, it definitely harms the range of the remote control. The projector can be shelf or ceiling mounted. The total depth is just under nineteen inches and it is about fourteen and a half wide. Its height is just over six and a half inches. A motorized door keeps dust off the lens, by closing when the JVC RS15 is powered off. There are adjustable front and rear feet.
The inputs are located on the right side (viewing from the front), just above the bottom. This is a plus for many who shelf mount as they don't need a few extra inches for connectors and cabling coming out of the back. For those ceiling mounting, well, I guess it depends which side of the projector faces people with the lights on.
The lamp gets replaced from a removable panel in the center of the back of the projector. So there is no need to unmount the RS15, if it is ceiling mounted (unlike a number of projectors who have their lamp doors on the bottom, which would be covered by a ceiling mount).
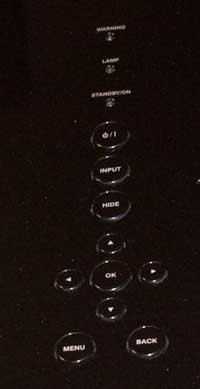
The RS15's control panel is located on the top. In the image on the right, you are viewing the panel from the back of the projector. The three indicator lamps are closest to the front of the projector. They are: Warning, Lamp, and Standby/On.
Further back is the first button, the Power switch. It's the usual press once for on, press twice for off. Next is the Input button, followed by a Hide button to black out the image.
Then comes the four arrow buttons in a diamond shaped arrangement, with a larger Enter button in the center.
Lastly, side by side, are the Menu, and (menu) Back button. Pretty standard stuff. Of course, we all primarily rely on the remote control, and probably only use the control panel during initial setup, if at all.
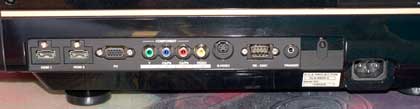
There seem to be no changes this year, in terms of I/O - inputs and outputs. Located on the side, from front to back, first there are two HDMI 1.3b compatible inputs. Next comes an analog PC input (standard HD15 connector), which the original RS1, and also the RS10 did not offer. I should note that the RS25 and RS15 both have the computer input, but the RS15 does not. (There are work arounds of course.)
Next up, are three RCA connectors for the component video input, followed by another RCA connector for basic composite video. Next is the S-Video input, followed by the RS-232 connector for controlling the projector directly from a computer or room controller. Finally, there is a 12 volt screen trigger for controlling a motorized screen or masking system.
Add all of them up, and you have a fairly standard complement of inputs and outputs, with no surprises. As with all home theater projectors, I'd still like to see three HDMI ports, but I've only seen that on a couple of 1080p projectors so far.
JVC has a very well designed menu structure. And that's coming from someone who's been living with it for a couple of years. In the past, though, using the menus was a pain, because the remote control had such poor range.
With JVC solving the remote control issue (see below), life is now good, and it's easy to find the logically laid out controls in the menus.
The RS15's menus are not quite identical to the more expensive JVC projectors. The differences center around two areas.
First, the DLA-RS15 projector lacks the pre-calibrated THX mode found on the RS25 and RS35.
Secondly, it lacks a full CMS to calibrate primary and secondary colors. One of the incentives JVC gives you to move up to the more expensive models, is the more sophisticated controls that allow to further perfect an already impressive color handling ability.
user 1
sharpness
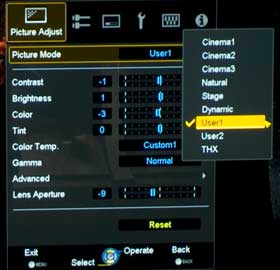
Most of the image goodies are found on the Picture menu, which is the first main menu in the top right when the main menu is open.
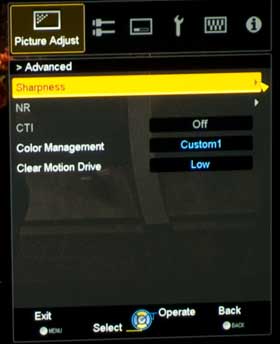
Besides the usual Brightness, Contrast, Color Saturation, etc., the Picture menu has a Gamma sub menu, and and Advanced sub-menu which has sharpness, and the all important CMS (color management system).
This year we have the addition of CFI - creative frame interpolation, which JVC calls Clear Motion Drive, as shown on the Picture Adjust, Advanced menu on the right. JVC has placed those choices in the Advanced menu, off of the Picture menu. That's a good place for it.
The Pixel Adjust menu allows the JVC to digitally shift the red, green, or blue, data by one pixel up/down/left/right. This means that if a JVC projector has any pixel misalignment greater than 1/2 pixel diameter (it can be corrected to less than that).
The JVC DLA-RS15 projector color temperature menu.This menu is the Color Temp menu for doing the basic grayscale adjustments. It's the same standard set of controls found on the more expensive JVC projectors. Note, you can save up to three custom color temp settings.
Our final menu is the gamma control menu, which is extremely flexibleThe JVC DLA-RS15 projector gamma menu..
Not only can you adjust the gamma of white, but also you can do each primary color separately. Further, the JVC RS15 comes with Normal, and 4 additional gamma presets, plus it allows you to save three of your own custom settings. Note also, that when doing so you can adjust each IRE point separately, and separate gamma controls for the primary colors as well as white.
I also like the grayscale provided on the screen, which gives you a good idea if you are crushing blacks or whites too much, or expanding them the way you want. A great Gamma control.
Introducing the Hisense C1: A cube-shaped 4K UHD lifestyle projector with an RGB triple laser light source and integrated JBL ...
The BenQ X3100i is a 4LED, 4K UHD (3,840 x 2,160p) 0.65" DLP short-throw gaming projector that offers a BenQ-rated ...