Menu
Image
This Mitsubishi HC4900 projector uses the same basic menu system as other Mitsubishi home theater projectors including it's "big brother", the HC5000. As a result, this menu section is copied directly from the HC5000 review.
The main menu has five options - Image, Installation, Feature, Signal, and Info.
The Image menu contains most of the goodies to adjust the image quality. Gamma mode lets you select between choices such as Cinema, Sports, Video, and Auto. You can also adjust the gamma manually for low medium and bright areas. Color Temp offers several different color temperatures - warm, medium, and cool. (In some other Mitsubishi home theater projectors, they actually listed temperatures, like 6500K, 7500K, etc., although our testing found that they weren't particularly accurate - so "warm" is safer than 6500K.) Shown immediately below the Image menu, is the Color Temp User menu, with separate controls for R, G, and B, for both Contrast and Brightness.
There are two User settings for Gamma, one for Color Temp, and those user settings, along with other settings like Brightness and Contrast can be saved in the AV Memory. There are three AV Memory save options as well.
Of course there is the usual Color saturation, Tint, and Sharpness, along with Brightness and Contrast adjustments on the Image Menu.
The Advanced menu gives you control of a number of items, but most notably, the Iris, with three different Auto Iris solutions, and Open (Iris wide open).
I played with the gamma controls (shown right) just a little, trying to see if I could bring a little more shadow detail out by lifting the Low values (and the medium just a notch). I had some success but, again did not play with it extensively.
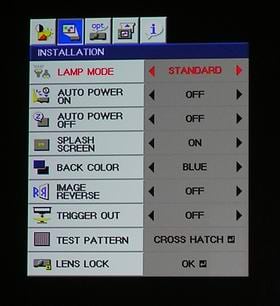
Moving on, next comes the Installation menu.
Of particular note is the first item, which is lamp power - Standard or Low.
After that, there are Auto Power On and Off functions, allowing the projector to turn off automatically when not in use, ranging from 5 to 60 minutes. Also present are the usual settings for front or rear, ceiling or table positioning, and control of the 12 volt trigger for motorized screen control.
You can also Lock the Lens Shift setting.
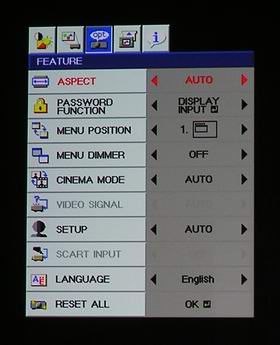
The next major menu is the Feature menu, shown below.

Image
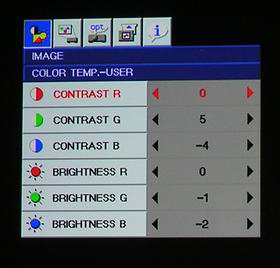
Image Temp
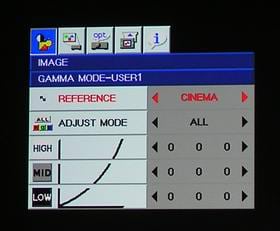
Image Gamma
Installation
Feature

Signal
That leaves two: The Signal menu which controls horizontal and vertical positioning, and Overscan control should a lower resolution image leave noise at the top or bottom of the screen.
Lastly is the Information menu, not shown, but identifies the resolution of the current source signal, and also has the lamp timer to show you how many hours are on the lamp.
Introducing the Hisense C1: A cube-shaped 4K UHD lifestyle projector with an RGB triple laser light source and integrated JBL ...
The BenQ X3100i is a 4LED, 4K UHD (3,840 x 2,160p) 0.65" DLP short-throw gaming projector that offers a BenQ-rated ...