Projector Reviews Images

2020 Guide to Projector Technology Terms - Installation (Part 2)

2020-Guide-to-Projector-Technology-Terms

Types of Projection Systems

Placement flexibility covers several areas. There are four different placement options as far as distance/screen size, and other aspects such as lens shift and keystone correction.

This part talks about the four different types of projector placements. Click each for advantages and disadvantages of each.

Standard projectors – are the most traditional. They are mounted high up, and many feet from the screen. Most such projectors have zoom lenses to make positioning forward to back easy.  Those projectors typically are ceiling mounted. In classrooms from 7 – 50+ feet back from the screen, depending on screen size. Most of the more expensive ones offer a range of lenses, that will work from wide angle (short throw) to very long throw (as much as 100+ feet back from a 10 foot screen. That, for example allows mounting a projector in the back of a large lecture hall, where it is easily accessible, instead of mounted in the middle of the ceiling hard to reach.

Standard Throw Projectors

Standard throw projectors overall, are the majority of the market, and, on a feature for feature basis,  brighter and offer more per dollar invested.  As they are typically ceiling mounted in class rooms and conference rooms, they have the disadvantage of being mounted on a different surface from the screen.  Many schools and businesses have drop ceilings which does help simplify the installation Ceiling mounting typically makes for a more expensive installation (it’s the labor!)

Short Throw Projectors

Short throw projectors by comparison mount less than half the distance back.  For screen sizes of 100” or smaller, they can usually be mounted on a telescoping arm, on a wall mount placed only inches above the screen, but telescoping to 40 or more inches.

Thanks to the telescoping mounts, these short throw projectors mount directly above the screen which makes wiring is a breeze by comparison to standard throw projectors.  Limitations include maximum screen size.  100” screens are about as large many short throw projectors can handle from those mounts.

Ultra Short Throw Projectors

USTs – Ultra short throw projectors typically sit from 4-10 inches from the screen!  Those are also commonly mounted to the wall above, but also will work on a credenza directly below the screen.

UST projectors are ideal for interactive use when teachers, presenters, staff, or students are up at the screen manipulating data or a presentation.  Because they are placed so close, those folks “presenting” aren’t blinded by the light from the projector. Most fully interactive projectors are UST projectors.  There are screen size limitations with interactive UST projectors in particular. They are still significantly more expensive than standard and short throw projectors.

Rear Projection

Lastly, there is the option for Rear placement of projectors behind the screen. Now there aren’t specific projectors designed to do rear projection. But most standard projectors that have lens options, and most UST projectors are good at it.  With a rear screen set up special translucent screens are used, with the projector placed behind. Since there’s rarely a lot of space behind, UST projectors or projectors with optional UST lenses are used. A third option – widely used for large installation, is a dual mirror array to dramatically shorten the distance from lens to screen. Rear placement is used many permanent displays because it is extremely effective, with handling a lot of ambient light!

More info is available on each of these projector types.

Laser Light Engine

For higher brightness some projectors use a dual blue laser light engine. One blue laser ultimately hits phosphor wheels to generate red and yellow beams, while the other blue laser handles the blue component. As with all 3LCD projectors a dichroic prism is used to re-assemble the three different colors into a single full color image.

Most projectors with laser light engines are rated for at least 20,000 hours at full power. As with a lamp-based system, the life rating is the point where 50% of the brightness has been lost. Once the light engine has run for 30,000 hours, the brightness will be reduced to 30%.

When many lasers projectors encounter a “black frame” of information, they can shut down the laser engine completely projecting a true black frame. Unlike lamp-based projectors, the power consumption is greatly reduced when implemented.

Projector Bulbs

Depending on usage, a projector’s bulb will have to be replaced after several thousand hours. Although the brightness is reduced, running a projector in its ECO mode can increase the projector’s lamp life by up to 60%.

If the projector is going to be mounted, try to avoid selecting a projector that must be taken down from the mount to change the lamp. For example, don’t choose a projector with the lamp access door on the bottom where the projector attaches to the mount. Removing the projector to make for a lamp replacement takes a whole lot longer and increases maintenance cost.

Fortunately, most projector’s lamp doors are located on the top or side of the unit. This allows fast lamp replacements, if a projector is already cool, it shouldn’t take more than 20 minutes. If you have to unmount the projector from the ceiling or wall mount, you probably need to add, at a minimum, an additional 20-30 minutes of service time

Filters

Virtually every LCD projector on the market has at least one filter. Since most DLP projectors have a sealed optical assembly, they usually do not. LCD projectors at some point will require a filter change but these days, frequency is about the same as lamp life replacement.

Depending on how many projectors that must be maintained, filter cleaning/replacement could be a logistical and expensive headache. If you have a lot of projectors, frequent filter cleaning can be a labor intensive and expensive chore especially if you are managing 500 projectors spread across 20 schools.

In some cases, the filters are designed to last as long, or even longer, than the projector lamps. We have reviewed some projector models that recommended changing its filters every 12,000 hours. In that timeframe you could have change the bulb 3 times.

Technology for Easier Installation

Below are some common technologies for improving the ease of installation.

Interchangeable Lenses

High-end and large venue projectors are sometimes sold both with or without a lens. The manufacturers usually offer several optional lenses with different throw ranges to use in specific or specialized situations. This provides the user with far more flexibility than a fixed lens. The same projector can be placed in the front of the room close to the screen using an ultra-short throw lens or way in the back of a large lecture hall using a long throw lens.

Lens Shift

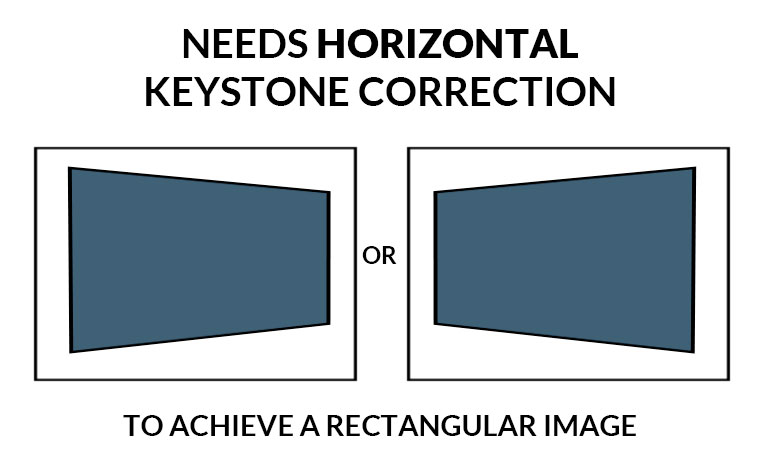
When a projector is properly aligned with the screen the image will be “perfectly” rectangular. We all have been in rooms where the image was much wider at the top than the bottom, that trapezoidal shape is usually referred to as Keystoning.

Let’s start with why that happens. A projector typically sits on a table so that its lens is about even (or slightly below) the bottom of the screen. Since the distance to the top left and right corners of the screen is farther from the lens than the bottom left and right corners, the image spreads out more. The result: a wide image at the top and a narrow image at the bottom.

If you can’t move the projector, lens shift is the preferred way to correct keystoning issues because unlike electronic keystone correction, it doesn’t affect resolution. Lens shifting moves the lens itself up and down and left and right within the projector’s chassis to align the projected image to the screen. A projector may offer both horizontal and vertical lens shift but the amount of overall adjustment can vary by projector type due to various internal layouts of projectors. Normally 3LCD projectors have a larger range of available lens shift than a comparable DLP model. Also, the amount of vertical adjustments applied affect the amount of horizontal adjustment available.

So, the bottom line, variable Lens Shift is the best way to keep your image rectangular unless you can place the projector right where it needs to be. For more information on Lens Shift check out the technical blog we wrote several years ago.

Digital Keystone Correction

If a projector is not perpendicularly aligned with the screen "Keystoning" can occur which means the image looks trapezoidal rather than square. Keystone issues are normally corrected by physically moving a projector left, right, up and down or tilting the projector.

If you can physically move a projector, higher-end projectors offer vertical and horizontal lens shifting to solve these alignment issues. Lens shift is the prefered way to correct keystoning because it doesn’t affect resolution.

If a projector does not offer lens shift a user can resort to digital keystone correction to try to properly fit the image on the screen.  While utilizing Digital Keystone Correction reduces resolution, many users are willing to sacrifice a little clarity to ensure that the projected image properly fits their screen.

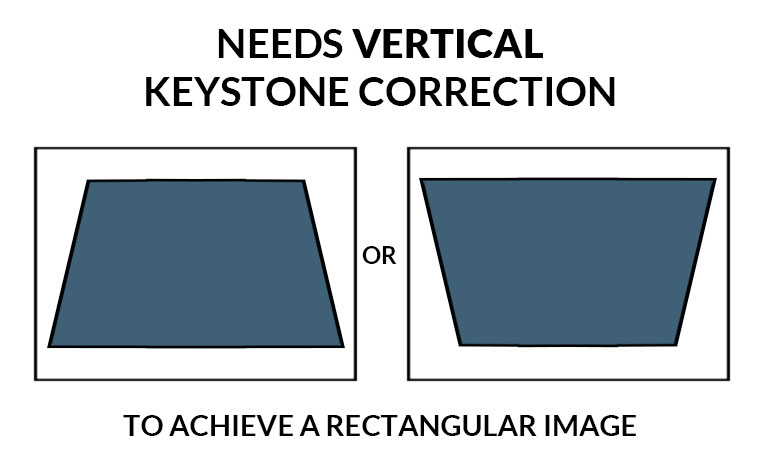
Some projectors offer both vertical and horizontal adjustment while others may only offer vertical adjustment. Horizonal keystone correction is designed fix issues caused by the projector not being aligned horizontally (left, right) with the screen. Vertical keystone correction is designed to fix issues caused when the projector is place too high or too low to properly align with the screen.

Projection Mapping

Projection mapping is masking the image digitally to light up non-traditional, often three-dimensional objects. This is used often at concerts, museums, and other digital signage applications. While there are powerful software-based projector mapping solutions, some projectors have a Geometric Correction feature which lets you correct image distortion caused by projecting an image onto a curved or right-angled screen. You cannot combine traditional H/V keystone correction with the other image shape correction methods with projection mapping.

Projector Blending

If you need more light output or want to utilize multiple projectors to display a larger, wider aspect image, many projectors are equipped with several features to make that goal easier.

By utilizing Edge Blending, you can split an image over multiple projectors and display it as one large image while reducing the hard transition from one projector to another. Under the Blend Range menu’s sub-setting, you can fine-tune the blend’s starting position and the width of the blended area. You can use the projector's Black Level setting to make the difference even less noticeable. The result is an image that looks seamless, like it’s being displayed by a single projector. However, Edge Blending can’t be combined with pixel shifting but that is okay in many situations where maximum flexibility is more important than absolute resolution.

Projectors with laser light engines offer a significant advantage over a bulb-based system in a long-term projector blended installation. If multiple lamp-based projectors are used, not only would the bulbs fail regularly, they will dim at different rates, causing color and brightness shifts. You would need to replace all the bulbs each time one failed to ensure similar characteristics and some additional calibration would probably still be required to produce ideal picture quality.

Inputs and Connectors

Inputs and connectors are typically located on the back or side of a projector. There are a variety of inputs for connecting video signal, audio signal, and command and control.

HDMI

One of the most common types of video connections is HDMI (High Definition Multimedia Interface). While computers may have multiple video outputs, many newer consumer video devices (streaming boxes, gaming systems, etc) only include support for HDMI.

There are multiple versions of HDMI Specifications. Each HDMI specification (i.e., HDMI 1.4b) defines support for various video, audio, and networking (Ethernet) signal formats. Each HDMI standard includes a shopping list of different video resolutions and refresh rates and specifies the technical details for how each of these signal formats is to be supported via HDMI.

HDMI featuresupport

For example, a projector would need to support at least HDMI 1.4a to be compatible with consumer HD video sources like a 3D Blu-ray player or gaming system. Higher HDMI specifications offer several user enhancement features and can also support more bandwidth.

It is the higher data rates between the connected A/V devices that makes video enhancements such as higher resolution and frame rates along with greater color depth possible. HDMI 2.1 specification offers much higher bandwidth capability (up to 48Gbps) than HDMI 2.0b (18Gpbs). This higher bandwidth supports a range of higher video resolutions and refresh rates including 8K@60 and 4K@120, and resolutions up to 10K.

Newer HDMI versions are backward compatible with older standards so you can utilize an older HD Blu-ray player with a newer 4K HDR projector. The chart below outlines content type supported by each HDMI specification:

HDMI CertificationVideo Formats Supported
1.4aHD (Blu-ray, Set Top Box)
1.4b4K@30fps (SDR)
2.0a4K@30fps (HDR/SDR)
2.0b4K@60fps (HDR/SDR)
2.14K@120fps / 8K@60fps

In addition, HDMI also has different levels of copyright protection called HDCP (High-bandwidth Digital Content Protection). Movie studios continue to demand more and more robust copy protection as the quality of available material increases (HD,4K, HDR, 8K) so the purpose of HDCP is to prevent content copying or playback on an unauthorized device.  For example, payback of copyrighted 4K SDR/HDR content requires support at least HDCP 2.2. In order to playback HDCP-encrypted content, all the devices in the video signal chain (projector, video switcher, A/V receiver, etc.) must be authorized to playback that level of HDCP content.

For more information on the various HDMI standards, check out the various technical blogs we have written in the past.

Links below are to technical blogs by ART and Phil on the subject of HDMI

HDMI 2.1: The Basics. And, Who Needs It Today – A Rant

HDMI 2.0 and Support 4K UHD Video

Beyond HDMI 1.4

HDMI Version (up to HDMI 1.4)

HDBaseT AND 3G-SDI Support

If you need to run a video signal hundreds of feet, there are two solutions:

  • HDBaseT lets you run HDMI distances of up to 100 meters (about 328 feet) over a low cost CAT5e/CAT6 wire. While the support is built into the projectors, you will need the optional transmitter to implement it. The cost savings of using HDBaseT can be significant which make it a very compelling feature for many installations.
  • 3G-SDI is another great long-distance solution especially for live video. This feature allows the projector to interface directly with a video camera (up to 1080p / WUXGA) located 100 meters away via coax. This is a big feature with big benefits for rental and staging customers, such as Houses of Worship (which are major users of live video and projectors), convention centers, university classrooms, corporate auditoriums and training rooms.

FYI, there are several additional SDI standards including HD-SDI which supports 720p/WXGA content and 6G-SDI which can support up to 4K resolution. Many users of large venue projectors are just fine with HD-SDI support.

Monitoring and Control

At a school or university there could be dozens or possibly hundreds of projectors scattered around the campus so the ability to quickly check remotely that each projector is performing satisfactorily is important. There may also be times where you may want to control multiple projectors simultaneously without reaching for the factory remote control.

Monitoring and Control via a network

Once you have connected a compatible projector to your network, you can control it using a web browser. This allows you to access the projector remotely and control things like focus, zoom, shift, and test patterns. You can even set up a networked projector to send you an e-mail alert if there is a problem. The email will list the name of the projector experiencing a problem and detailed information about the issue. In addition to being able to control a projector via a web browser, some manufacturers offer software program options which can be used to monitor and control the projector.

Some Projector Management software allows you to check the status of multiple networked projectors and perform various projector operations from your computer. You can monitor the status of multiple projectors and get information such as such as power status, errors, and warnings so you are alerted to projector abnormalities immediately. You can also select individual projectors or projector groups to check detailed information such as the usage hours of the projector light source, the current input source and any current errors or warnings. This software is more focused on monitoring.

Projector Professional Tools offer further flexibility by allowing you to adjust and control images projected from networked projectors using a computer. You can focus, shift, zoom, apply Geometric Correction, fine tune Edge Blending and much more on multiple projectors without having to reach for a remote control. This software option is more focused on control.

It can be downloaded from a manufacturer’s support site. Previous testing has proven that these programs work well and provide lots of controls, including the list below:

  • Remote access and control through a network
  • Remote monitoring of literally hundreds pf networked projectors
  • View status – including input sources, power on/off, lamp life hours and more
  • Email notification (SMTP) to send alerts to your handheld device or computer
  • Preventative maintenance features including temperature levels and error alerts
  • Pre-schedule timers to alert filter and lamp replacement needs
  • Enterprise SNMP plug-in available

3rd Party Control

In addition to control software offered by the manufacturer, many business/installation and education class projectors are also compatible with 3rd party control systems such as the Crestron RoomView network monitoring and control system, which also allows you to setup and adjust a networked projector.

DMX ART-NET

DMX is an older command and control system that is best known for controlling lighting. DMX is still used heavily today for stage work and in classrooms. It is still a viable solution for theaters putting on live shows and concerts.

With DMX Art-Net, projectors can be controlled/automated along with the rest of the lighting which can be a powerful way to tackle things like projection mapping (which is utilized in many concerts these days).

Latest Reviews

February 25, 2024

Introducing the Hisense C1: A cube-shaped 4K UHD lifestyle projector with an RGB triple laser light source and integrated JBL ...

February 19, 2024

The BenQ X3100i is a 4LED, 4K UHD (3,840 x 2,160p) 0.65" DLP short-throw gaming projector that offers a BenQ-rated ...

January 20, 2024

The BenQ V5000i is a $3,499 smart ultra-short throw 4K projector with RGB triple laser source. Ideal for vibrant, bright ...

© 2024 Projector Reviews

crossmenu linkedin facebook pinterest youtube rss twitter instagram facebook-blank rss-blank linkedin-blank pinterest youtube twitter instagram