Projector Reviews Images

Sharp XG-P560W 3-chip DLP Projector - Physical Tour

Posted on October 4, 2013 by Art Feierman

Physical Tour

Facing the front of the XG-P560W, the lens is mounted slightly to the left of center and recessed into the case.  There is a plastic lens cap that protects the lens from damage and dust when the projector’s not in use.  To the right of the lens is a button that, when pressed, allows removal of the lens cover for changing the lens (when using one of the optional lenses).  On the right side of the front face, along the top edge, are indicator lights for high temperature warning, each of the two lamps and power.  To the right of the indicator lights is an IR receiving eye.  The built-in stereo speakers are on the top of the projector just inside each front corner.  On the bottom of the projector, in each front corner, there are two adjustable feet to assist in leveling the projector when table or shelf mounted.

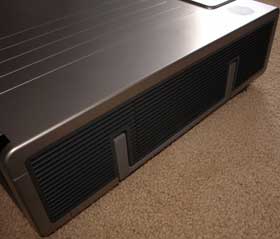
Moving to the left side (facing it from the front) of the projector, there is a swing-out handle for carrying the projector.  This comes in handy as the size and weight of the XG-P560W make it difficult for one person to carry otherwise.  Using the handle allows one to move its nearly sixty pound weight with much less strain.  In the middle of the handle is an easily removable dust filter.  Locating the dust filter on the side of the projector makes it easily accessible for regular cleaning.

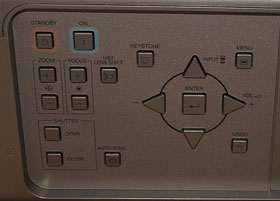
On the right side of the projector we find an exhaust port, followed by the cover for access to both lamps, which are installed side-by-side. As is the case with the dust filter, the placement of the lamp cover allows for easy access when the projector is ceiling mounted, without having to unmount it. The rear panel of the Sharp XG-P560W projector.The rear panel consists of a number of controls and connections. Facing the rear of the projector moving from left to right, we start with a control panel with a number of buttons that provide some of the more important functions also found on the remote control. There are buttons for Standby, On, Zoom and Focus +/-, The Sharp XG-P560W projector control panel.Shutter Open/Close, Auto Sync, Lens Shift, Keystone, Up, Down, Left, Right, Menu and Undo. When the menu or lens shift is not in use, The Up/Down buttons double as Input selection controls and the Left/Right buttons acts as Volume Up/Down for the built-in speakers.

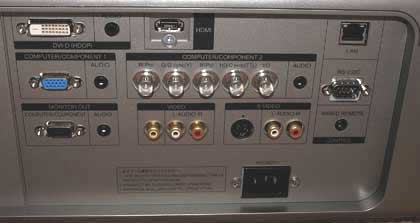
Continuing to the right, we find a large number of different connections.  Moving from left to right, there is a DVI-D terminal with associated audio jack, a computer/component RGB input and computer RGB output, each with an associated audio jack.  Moving on, there is an HDMI input and a second computer/component connection featuring 5 BNC jacks and an associated audio input.  Below these connectors are standard composite video and S-video inputs, also with audio jacks for each.  Continuing on, there is a LAN port, RS-232 terminal for serial control, a jack for the wired remote option and the AC power socket.  There is also a second IR receiving eye on the top right edge and a Kensington lock port on the bottom left side of the rear panel.

Sharp XG-P560W Remote Control

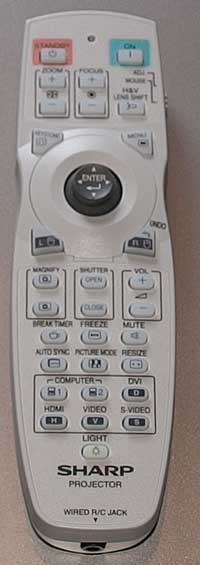
The XG-P560W comes with a well-designed remote that makes the most-used functions easily accessible.  It can also be used as a wireless mouse with an optional IR receiver for your computer.  There is a glow-in-the-dark backlight button that lights up all the other buttons when pressed for ease of operation in a dark room. Starting from the top of the remote, there are On and Standby buttons framed in green and red respectively for easy identification.  Below those are plus/minus buttons for the power zoom and focus and a button to activate the power horizontal and vertical lens shift.  Lens shift is then controlled by a joystick (with center “Enter” function) just below.  The joystick is also use for menu navigation and wireless mouse functions, which are activated via a slide switch on the right side of the remote.  The joystick is flanked by buttons to the left and right above, which activate the keystone adjustment and menu respectively.  Below and to each side of the joystick are buttons for left and right mouse clicks (when using the remote as a wireless mouse).  The right click button also serves as an “Undo” button when using the remote normally. The bottom half of the remote houses similarly shaped buttons for magnifying specific areas of the display, opening and closing the shutter (to blank the image), adjusting the volume of the built-in speakers, setting a “break” timer, freezing the image, muting the sound, automatically syncing the input signal, changing the picture mode and resizing the image.  Below those buttons in a group defined within a black outline are buttons to select the various inputs: Computer1 and 2, DVI, HDMI, Video and S-Video.  Next is the aforementioned backlight button and on the bottom of the remote, a jack for wiring the remote to the projector (for use when the projector is mounted outside the remote’s line-of-sight).

Click Image to Enlarge

Sharp XG-P560W Menus

The menus of the XG-P560W are not only impressive, but extensive. It should be noted that the Sharp has a very good color management system, as one would expect from a commercial 3 chip DLP projector, since this class of projector are usually demanded for applications calling for the best possible picture quality.

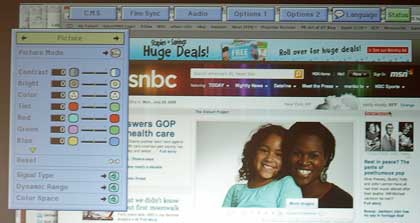
The image above shows the top menu bar, and the Picture Mode controls.

Menus are well laid out, and pretty straightforward. A "main menu" bar appears across the top of the image (as a series of rectangular buttons), while the main menu that is selected is a typical box, found below the menu "bar".

In addition to the standard color controls, the Sharp's CMS allows for separate adjustment of the individual primary and secondary colors. That's about as much control as you would find in a top quality home theater projector, and it makes the point that this 3 chip DLP projector takes its ability to do excellent color, very seriously.

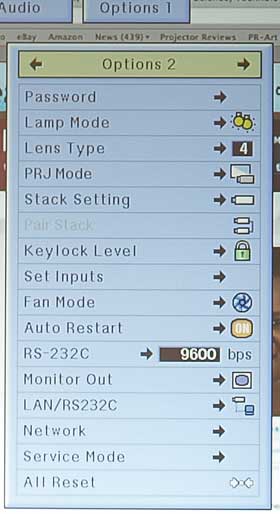
Shown to the right, is the Options 2 menu, which handles lamp controls, lens type, fan speed, security, and networking, to mention a few of the options found there.

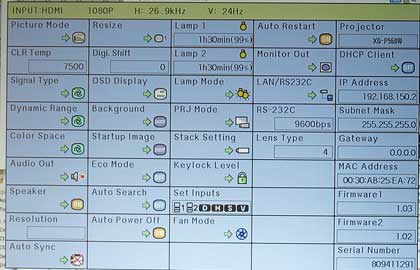
Also of particular note, is the final menu - the Info menu. I must admit, that's about the most comprehensive "info" menu I've seen to date:

Latest Reviews

February 25, 2024

Introducing the Hisense C1: A cube-shaped 4K UHD lifestyle projector with an RGB triple laser light source and integrated JBL ...

February 19, 2024

The BenQ X3100i is a 4LED, 4K UHD (3,840 x 2,160p) 0.65" DLP short-throw gaming projector that offers a BenQ-rated ...

© 2024 Projector Reviews

crossmenu linkedin facebook pinterest youtube rss twitter instagram facebook-blank rss-blank linkedin-blank pinterest youtube twitter instagram