There are several benefits shared by all projectors that use lasers as a light source. First, laser-based light engines turn on within seconds of pressing the power button. There is no time wasted waiting for a lamp to warm up or cool down. Old mercury lamps can be damaged if unplugged before the cooling-down period ends.
Laser-based light engines are incredibly reliable, lasting anywhere from 20k to 30k hours, and are mostly maintenance-free. Chances are, you would need to replace the entire projector long before the laser light engine fails.
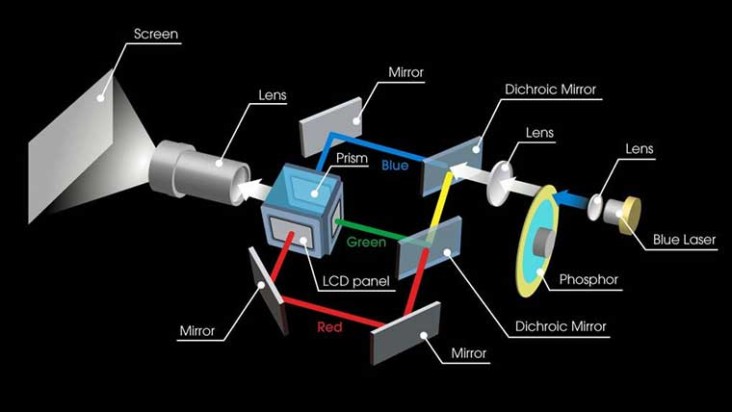
Laser light engines are incredibly bright compared to lamps and most LED-based light systems, so they would typically be the best option for projecting on large surfaces. There are typically three types of laser-light engine designs used by today’s projector manufacturers.
Most laser projectors utilize the least expensive solution, which is a single blue laser diode array that provides the blue light and excites a yellow phosphor color wheel. Filters are then used to break up the yellow into red and green elements.
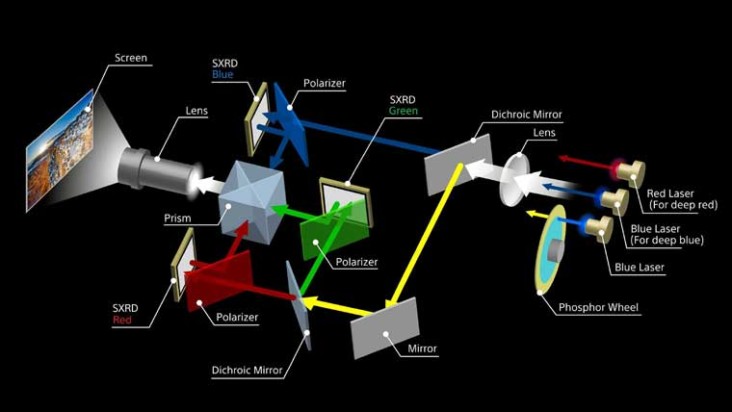
For higher brightness, some projectors use a dual blue laser light engine. One blue laser ultimately hits phosphor wheels to generate red and yellow beams, while the other blue laser handles the solely the blue component.
There are several benefits shared by all projectors that use lasers as a light source. First, laser-based light engines turn on within seconds of pressing the power button. There is no time wasted waiting for a lamp to warm up or cool down. Old mercury lamps can be damaged if unplugged before the cooling-down period ends.
Laser-based light engines are incredibly reliable, lasting anywhere from 20k to 30k hours, and are mostly maintenance-free. Chances are, you would need to replace the entire projector long before the laser light engine fails.
Laser light engines are incredibly bright compared to lamps and most LED-based light systems, so they would typically be the best option for projecting on large surfaces. There are typically three types of laser-light engine designs used by today’s projector manufacturers.
Laser Phosphor
Most laser projectors utilize the least expensive solution, which is a single blue laser diode array that provides the blue light and excites a yellow phosphor color wheel. Filters are then used to break up the yellow into red and green elements.
For higher brightness, some projectors use a dual blue laser light engine. One blue laser ultimately hits phosphor wheels to generate red and yellow beams, while the other blue laser handles the solely the blue component.
Hybrid Laser Light Engine
For improved color reproduction, another laser light configuration combines a red LED and a blue laser that uses a phosphor chip or a color wheel to generate green light. These hybrid laser projectors out-perform lamp-based projectors in brightness while delivering superior color and long life.
Discrete RGB Laser
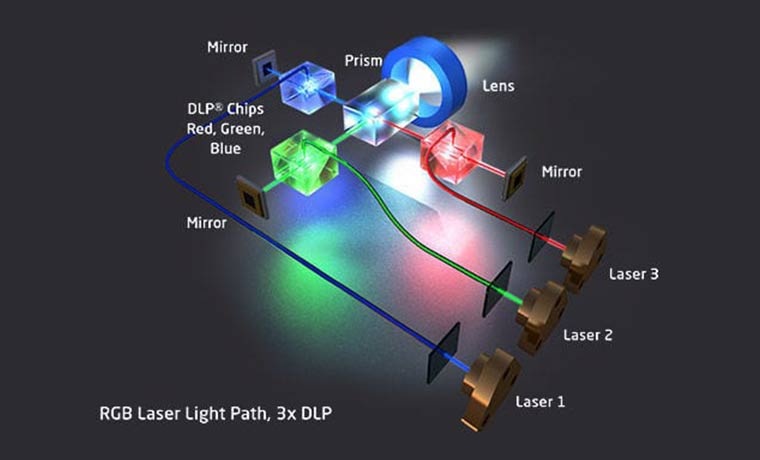
The best solution is to utilize multiple RGB lasers instead of a phosphor wheel and filters to create clean primary colors. Multi-channel laser light engines tend to produce a wider color gamut, making them a perfect choice for installations that require color accuracy in their displayed content.
Triple Laser Technology
In addition to much more accurate colors, because red, green, and blue light is produced by different lasers, a wider color gamut is also possible. Since the RGB laser wavelengths are specifically chosen to optimize the primary colors of red, green, and blue, a RGB laser projector has the ability to reproduce DCI-P3 or even the Rec. 2020 color gamut without the need for a color filter.
Discrete RGB laser light engines are considered to be the best projector light source available, but this performance comes at a price. Laser projectors tend to be physically larger than other types of projectors and are also very expensive. These systems offer the best brightness, so for installations requiring a huge projection screen, this would be the best solution.
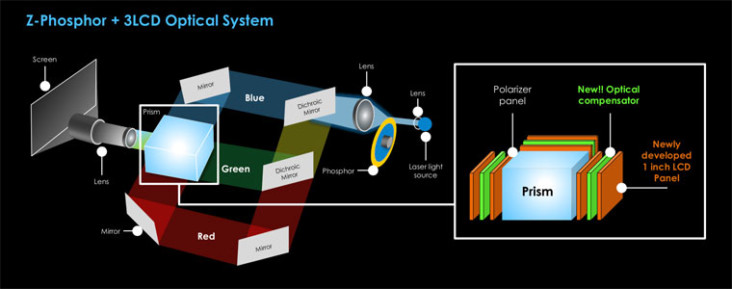
The technology behind LCD (Transmissive Liquid Crystal Display) starts off with a single light source, just like with DLP. But, with LCD and 3LCD, the single light source is split into 3 beams — one each for red, green, and blue – the primary colors. Once the light is split, mirrors send the beams to different locations inside the projector box. At that point, the light passes through one of the LCD panels (or three panels if it is a 3LCD projector). These panels are not colored, but grayscale, and each has a different color filter. The end result, when light passes through them, is the red, green, and blue beams that then pass through a dichroic prism, which recombines the three beams into a single full color beam.
How LCD works is a laser-phosphor light engine a blue laser emits blue light, some of which excites a yellow phosphor. That yellow light is split into red and green, and each color passes through its own LCD imaging panel. The light from the three panels is then combined and sent through the lens to the screen.
While early LCD projectors contrast performance was behind its DLP competition, the last six years has seen remarkable leaps forward for LCD.
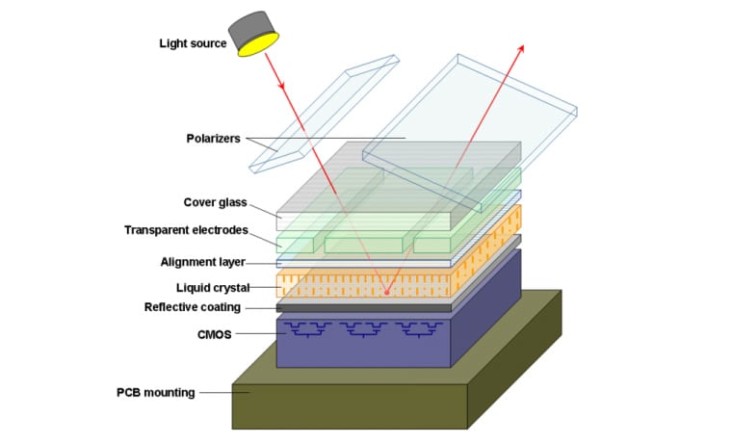
A projector is more than the sum of its parts. It has been said that the actual projector is only one half of the equation, with the screen being the other factor that impacts perceived picture quality. The truth is you have to look at the projector systemically. When you do you will find, among other improvements, the dynamic iris contributes to LCD projector’s improved contrast.With LCoS displays, the process is similar to 3LCD, in that you start by splitting the light into three beams. A key difference, though, is that LCoS (Liquid Crystal on Silicon) is a reflective panel (like DLP) rather than transmissive (light passing through it), like the 3LCD panels. So, light bounces off of the LCoS panels, then to a dichroic prism (like 3LCD) to recombine the light into a single, full-color image.
LCoS imagers have a higher pixel density than their DLP or LCD counterparts so a smaller LCoS chip can produce more resolution. This is why most native 4K Home Theater projectors utilize LCoS chips.
How LCoS Works
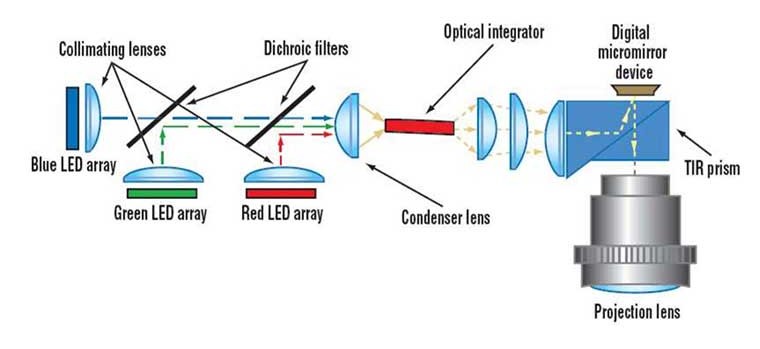
What this means is about is 8 million pixels, each producing an individual element of the picture. There are other ways of displaying 4K. Technologies like DLP’s wobulation and LCD’s pixel-shifting are some examples. But are these native 4K? It’s something of a debate in the industry. Is native resolution determined by how many pixels you can see on the screen or how many pixels or mirrors exist on the chip? You’re going to have to be the judge of that because it’s about how you perceive the picture.DLP (Digital Light Processor) works when light passes through a spinning RGB color wheel and then bounces off a single DLP (or DMD, Digital Micromirror Device) chip that is covered with micro-mirrors. The light is reflected off the mirrors on the chip, then passes through the projector’s lens and onto the screen to produce an image. Because DLP projectors only require a single chip, they are often among the smallest and most portable projectors on the market.
The resolution and performance of DLP chips have improved with each successive generation. Native resolution has increased up to WUXGA (1920 x 1200). While a DLP chip does not have 8.3 million mirrors, it can deliver a perceived resolution of 4K (3840 x 2160).
DLP XPR technology leverages the immense speed of the DMD (Digital Micromirror Device) to process pixels faster than the rate of the video signal. This speed is how DLP can utilize one imaging chip to create multiple colors and multiple pixel locations.
In the earlier DMD designs, the pixel would only pivot on or off using one hinge and axis. The XPR chip tilts in 4 directions and operates fast enough for our eyes to see all the pixels and perceive the entire image all at once.
While the newest 0.47″ DMD chips only have about 2.1 million mirrors, they can deliver a perceived resolution of 8.3 million pixels. This system works so well that it would be difficult for any viewer to see a difference in resolution from a native 4K UHD (8.3 megapixels) imager.Short throw projectors by comparison mount less than half the distance back. For screen sizes of 100” or smaller, they can usually be mounted on a telescoping arm, on a wall mount placed only inches above the screen, but telescoping to 40 or more inches.
Thanks to the telescoping mounts, these short throw projectors mount directly above the screen which makes wiring is a breeze by comparison to standard throw projectors. Limitations include maximum screen size. 100” screens are about as large many short throw projectors can handle from those mounts.
Standard throw projectors overall, are the majority of the market, and, on a feature for feature basis, brighter and offer more per dollar invested.
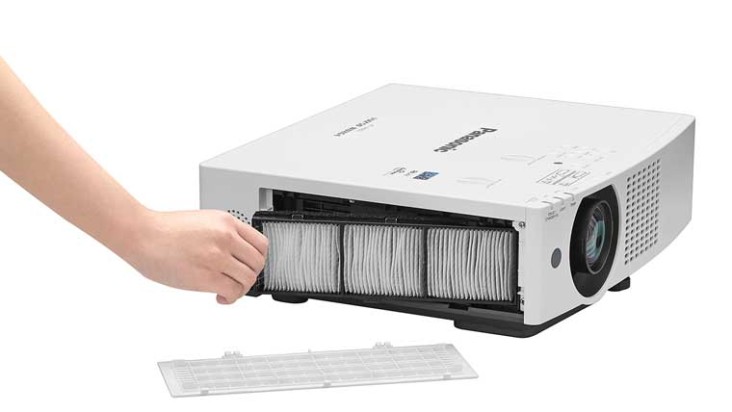
As they are typically ceiling mounted in class rooms and conference rooms, they have the disadvantage of being mounted on a different surface from the screen. Many schools and businesses have drop ceilings which does help simplify the installation Ceiling mounting typically makes for a more expensive installation and can be a bit more difficult to maintain.Virtually every LCD projector on the market has at least one filter. Since most DLP projectors have a sealed optical assembly, they usually do not. LCD projectors at some point will require a filter change but these days, frequency is about the same as lamp life replacement.
Depending on how many projectors that must be maintained, filter cleaning/replacement could be a logistical and expensive headache. If you have a lot of projectors, frequent filter cleaning can be a labor intensive and expensive chore especially if you are managing 500 projectors spread across 20 schools.
In some cases, the filters are designed to last as long, or even longer, than the projector lamps. We have reviewed some projector models that recommended changing its filters every 12,000 hours. In that timeframe you could have change the bulb 3 times.
Depending on usage, a projector’s bulb will have to be replaced after several thousand hours. Although the brightness is reduced, running a projector in its ECO mode can increase the projector’s lamp life by up to 60%.
Replacement Projector Lamp / Bulb
If the projector is going to be mounted, try to avoid selecting a projector that must be taken down from the mount to change the lamp. For example, don’t choose a projector with the lamp access door on the bottom where the projector attaches to the mount. Removing the projector to make for a lamp replacement takes a whole lot longer and increases maintenance cost.
Fortunately, most projector’s lamp doors are located on the top or side of the unit. This allows fast lamp replacements, if a projector is already cool, it shouldn’t take more than 20 minutes. If you have to unmount the projector from the ceiling or wall mount, you probably need to add, at a minimum, an additional 20-30 minutes of service timeResolution is a term that refers to the number of horizontal and vertical pixels of the projected image. The higher the number of pixels, the higher the resolution, and the sharper the image.
Common resolutions found on projectors:
Type
Resolution
Aspect Ratio
SVGA*
800 x 600
4:3
WVGA*
853 x 480
16:9
XGA
1024 x 768
4:3
WXGA
1280 x 800
16:10
WUXGA
1920 x 1200
16:10
720p
1280 x 720
16:9
1080p
1920 x 1080
16:9
4K UHD
3840 x 2160
16:9
* SVGA and WVGA are essentially “legacy” resolutions.
While there are still some very low cost projectors sold with SVGA an WVGA resolutions (including some “toy” priced dim LED pico projectors for home), but they are no longer normally bought by schools. There are still large numbers of them in K-12 schools. Most are long overdue for replacement. Their bulbs last only a fraction of the life of new projectors (nevermind laser projectors), so the cost of supporting those old projectors is high.
XGA models are typically used to replace the SVGA (and if any are still around – VGA) projectors. SVGA projectors are typically replaced by WXGA, WUXGA or 1080p projectors.
HD VS PIXEL SHIFTING VS NATIVE 4K
Most pixel shifting projectors can accept up to a 4K signal. While pixel shifting can’t match the resolution of a true 4K projector, it does increase sharpness and detail compared to a standard 2K projector. When fed 4K content, the projector uses pixel shifting to fine tune the image to more closely resemble 4K. Pixel shifting fires each pixel twice by shifting the location by 1/2 pixel diagonally. Combined with good image processing, pixel shifting can do a very nice job emulating the original 4K content.
The images above show the noticeable improvement pixel shifting provides when viewing 2K and 4K content. The images above are screenshots of projected 4K material. The first images are close ups showing the same image with Pixel Shifting Off and On. They really highlight how much this feature increases the clarity and detail of a WUXGA projector.
When viewed in person, the actual differences on the screen are greater than what you are seeing on this site. This is because of the heavy compression and scaling of the images for the web, so the differences you are seeing when viewing it on this website will be less noticeable. As you can see in the above images, when you compare 4K content with pixel shifting turned on and off, the difference is impressive.
Small type and fine details that can’t be discerned on a basic 2K – WUXGA (or 1,080p) projector can often be resolved with pixel shifting. It is enough to make a real readability difference on CAD, engineering, and scientific drawings, renderings, or anything else demanding max detail.
It is only when you do a side-by-side comparison between a true 4K projector versus a 2K pixel shifting projector that the resolution difference is noticeable. The images below show the visible resolution difference between a native 4K projector and a projector utilizing pixel shifting when displaying native 4K content.
4K Content shown on a pixel shifting Projector
4K Content shown on a native 4K Projector
Since the projector’s native resolution is approximately 2.3 MP, it won’t be as sharp/detailed as a true 4K projector (8,8 MP resolution). While a Pixel Shifting HD projector does deliver more clarity, it still can’t match the resolution provided by a native 4K projector.
Pixel Shifting also requires a lot of processing so it can’t be combined with some features like edge blending and Creative Frame Interpolation but even some more basic things, including some types of noise reduction cannot be utilized.
So how do I choose between a pixel-shifting projector and a true 4K projector? To make a wise decision you must factor in your budget, what you are watching, and from where you are watching it.
True 4K high lumens projectors cost at least four to five times as much as their 2K counterparts. Consider this, an 8,000 lumen true 4K laser projector can retail for $60,000 while an Epson pixel shifting 16,000 lumen 2K laser projector costs about 1/3 of that amount. This will be true until we see dramatic price drops in the true native 4K projectors to make them more price competitive. True 4K projectors are going to be hard to justify in most situations even when 4K content will be used.
In many situations, the content lacks the detail required and is viewed at a distance where the difference between 4K and pixel shifting cannot be perceived. While pixel shifting can’t match the resolution of a true 4K projector, it does increase sharpness and detail compared to a standard 2K projector.
So, if the image is going to be viewed from fairly far away, a brighter, less expensive pixel shifting projector might be a better option. In many situations the benefit of extra brightness far exceeds the benefits of additional resolution.
EQUIVALENT VISIBILITY RULE
The Equivalent Visibility Rule is used to determine how large a display size is needed when teaching or “presenting” to a group, regardless of the number of those attending the class or meeting. It is more effective today than the old 4/6/8 rule long used for determining how large a projection screen or monitor is needed, in a room.
Background: No longer do we primarily present to the classroom or conference room with presentation software such as PowerPoint. Or, rather we still do, however, today we are also electronically displaying emails, websites, spreadsheets, documents, engineering drawings, art work, and much more.
4/6/8 (without getting into it) is an old “A/V” rule that was good for figuring out if the person in the back of the room can follow a presentation using typical large type (30, 36, 48, and 60 point). But, it doesn’t work well when you need that person to be able to read the numbers on a spreadsheet.
Essentially, the Equivalent Visibility Rule answers this problem. Given that people work with spreadsheets, docs, detailed drawings, etc. normally their desks, and can read all that content without trouble, then if those people typically have about a 21” monitor on their desk and sit about 28” back, how large a display would be needed for a person sitting 10 or 12, or 30 feet from the display?
You may be surprised. If the person furthest back in the room is 15 feet from the screen or display, then to read all that small type – the screen should be (drumroll…) at least 100” diagonal. And ideally between 120” and 150”.

 How LCD works is a laser-phosphor light engine a blue laser emits blue light, some of which excites a yellow phosphor. That yellow light is split into red and green, and each color passes through its own LCD imaging panel. The light from the three panels is then combined and sent through the lens to the screen.
While early LCD projectors contrast performance was behind its DLP competition, the last six years has seen remarkable leaps forward for LCD.
A projector is more than the sum of its parts. It has been said that the actual projector is only one half of the equation, with the screen being the other factor that impacts perceived picture quality. The truth is you have to look at the projector systemically. When you do you will find, among other improvements, the dynamic iris contributes to LCD projector’s improved contrast.With LCoS displays, the process is similar to 3LCD, in that you start by splitting the light into three beams. A key difference, though, is that LCoS (Liquid Crystal on Silicon) is a reflective panel (like DLP) rather than transmissive (light passing through it), like the 3LCD panels. So, light bounces off of the LCoS panels, then to a dichroic prism (like 3LCD) to recombine the light into a single, full-color image.
LCoS imagers have a higher pixel density than their DLP or LCD counterparts so a smaller LCoS chip can produce more resolution. This is why most native 4K Home Theater projectors utilize LCoS chips.
How LCD works is a laser-phosphor light engine a blue laser emits blue light, some of which excites a yellow phosphor. That yellow light is split into red and green, and each color passes through its own LCD imaging panel. The light from the three panels is then combined and sent through the lens to the screen.
While early LCD projectors contrast performance was behind its DLP competition, the last six years has seen remarkable leaps forward for LCD.
A projector is more than the sum of its parts. It has been said that the actual projector is only one half of the equation, with the screen being the other factor that impacts perceived picture quality. The truth is you have to look at the projector systemically. When you do you will find, among other improvements, the dynamic iris contributes to LCD projector’s improved contrast.With LCoS displays, the process is similar to 3LCD, in that you start by splitting the light into three beams. A key difference, though, is that LCoS (Liquid Crystal on Silicon) is a reflective panel (like DLP) rather than transmissive (light passing through it), like the 3LCD panels. So, light bounces off of the LCoS panels, then to a dichroic prism (like 3LCD) to recombine the light into a single, full-color image.
LCoS imagers have a higher pixel density than their DLP or LCD counterparts so a smaller LCoS chip can produce more resolution. This is why most native 4K Home Theater projectors utilize LCoS chips.
 How LCoS Works
What this means is about is 8 million pixels, each producing an individual element of the picture. There are other ways of displaying 4K. Technologies like DLP’s wobulation and LCD’s pixel-shifting are some examples. But are these native 4K? It’s something of a debate in the industry. Is native resolution determined by how many pixels you can see on the screen or how many pixels or mirrors exist on the chip? You’re going to have to be the judge of that because it’s about how you perceive the picture.DLP (Digital Light Processor) works when light passes through a spinning RGB color wheel and then bounces off a single DLP (or DMD, Digital Micromirror Device) chip that is covered with micro-mirrors. The light is reflected off the mirrors on the chip, then passes through the projector’s lens and onto the screen to produce an image. Because DLP projectors only require a single chip, they are often among the smallest and most portable projectors on the market.
How LCoS Works
What this means is about is 8 million pixels, each producing an individual element of the picture. There are other ways of displaying 4K. Technologies like DLP’s wobulation and LCD’s pixel-shifting are some examples. But are these native 4K? It’s something of a debate in the industry. Is native resolution determined by how many pixels you can see on the screen or how many pixels or mirrors exist on the chip? You’re going to have to be the judge of that because it’s about how you perceive the picture.DLP (Digital Light Processor) works when light passes through a spinning RGB color wheel and then bounces off a single DLP (or DMD, Digital Micromirror Device) chip that is covered with micro-mirrors. The light is reflected off the mirrors on the chip, then passes through the projector’s lens and onto the screen to produce an image. Because DLP projectors only require a single chip, they are often among the smallest and most portable projectors on the market.
 The resolution and performance of DLP chips have improved with each successive generation. Native resolution has increased up to WUXGA (1920 x 1200). While a DLP chip does not have 8.3 million mirrors, it can deliver a perceived resolution of 4K (3840 x 2160).
DLP XPR technology leverages the immense speed of the DMD (Digital Micromirror Device) to process pixels faster than the rate of the video signal. This speed is how DLP can utilize one imaging chip to create multiple colors and multiple pixel locations.
In the earlier DMD designs, the pixel would only pivot on or off using one hinge and axis. The XPR chip tilts in 4 directions and operates fast enough for our eyes to see all the pixels and perceive the entire image all at once.
While the newest 0.47″ DMD chips only have about 2.1 million mirrors, they can deliver a perceived resolution of 8.3 million pixels. This system works so well that it would be difficult for any viewer to see a difference in resolution from a native 4K UHD (8.3 megapixels) imager.Short throw projectors by comparison mount less than half the distance back. For screen sizes of 100” or smaller, they can usually be mounted on a telescoping arm, on a wall mount placed only inches above the screen, but telescoping to 40 or more inches.
Thanks to the telescoping mounts, these short throw projectors mount directly above the screen which makes wiring is a breeze by comparison to standard throw projectors. Limitations include maximum screen size. 100” screens are about as large many short throw projectors can handle from those mounts.
The resolution and performance of DLP chips have improved with each successive generation. Native resolution has increased up to WUXGA (1920 x 1200). While a DLP chip does not have 8.3 million mirrors, it can deliver a perceived resolution of 4K (3840 x 2160).
DLP XPR technology leverages the immense speed of the DMD (Digital Micromirror Device) to process pixels faster than the rate of the video signal. This speed is how DLP can utilize one imaging chip to create multiple colors and multiple pixel locations.
In the earlier DMD designs, the pixel would only pivot on or off using one hinge and axis. The XPR chip tilts in 4 directions and operates fast enough for our eyes to see all the pixels and perceive the entire image all at once.
While the newest 0.47″ DMD chips only have about 2.1 million mirrors, they can deliver a perceived resolution of 8.3 million pixels. This system works so well that it would be difficult for any viewer to see a difference in resolution from a native 4K UHD (8.3 megapixels) imager.Short throw projectors by comparison mount less than half the distance back. For screen sizes of 100” or smaller, they can usually be mounted on a telescoping arm, on a wall mount placed only inches above the screen, but telescoping to 40 or more inches.
Thanks to the telescoping mounts, these short throw projectors mount directly above the screen which makes wiring is a breeze by comparison to standard throw projectors. Limitations include maximum screen size. 100” screens are about as large many short throw projectors can handle from those mounts.
 Standard throw projectors overall, are the majority of the market, and, on a feature for feature basis, brighter and offer more per dollar invested.
 As they are typically ceiling mounted in class rooms and conference rooms, they have the disadvantage of being mounted on a different surface from the screen. Many schools and businesses have drop ceilings which does help simplify the installation Ceiling mounting typically makes for a more expensive installation and can be a bit more difficult to maintain.Virtually every LCD projector on the market has at least one filter. Since most DLP projectors have a sealed optical assembly, they usually do not. LCD projectors at some point will require a filter change but these days, frequency is about the same as lamp life replacement.
Depending on how many projectors that must be maintained, filter cleaning/replacement could be a logistical and expensive headache. If you have a lot of projectors, frequent filter cleaning can be a labor intensive and expensive chore especially if you are managing 500 projectors spread across 20 schools.
In some cases, the filters are designed to last as long, or even longer, than the projector lamps. We have reviewed some projector models that recommended changing its filters every 12,000 hours. In that timeframe you could have change the bulb 3 times.
As they are typically ceiling mounted in class rooms and conference rooms, they have the disadvantage of being mounted on a different surface from the screen. Many schools and businesses have drop ceilings which does help simplify the installation Ceiling mounting typically makes for a more expensive installation and can be a bit more difficult to maintain.Virtually every LCD projector on the market has at least one filter. Since most DLP projectors have a sealed optical assembly, they usually do not. LCD projectors at some point will require a filter change but these days, frequency is about the same as lamp life replacement.
Depending on how many projectors that must be maintained, filter cleaning/replacement could be a logistical and expensive headache. If you have a lot of projectors, frequent filter cleaning can be a labor intensive and expensive chore especially if you are managing 500 projectors spread across 20 schools.
In some cases, the filters are designed to last as long, or even longer, than the projector lamps. We have reviewed some projector models that recommended changing its filters every 12,000 hours. In that timeframe you could have change the bulb 3 times.
 Depending on usage, a projector’s bulb will have to be replaced after several thousand hours. Although the brightness is reduced, running a projector in its ECO mode can increase the projector’s lamp life by up to 60%.