Menu:
Advanced
Over all, the W1200 home projector, is a smallish medium sized projector. While there are smaller ones, this home theater projector is just still smaller than average. Most of the LCD projectors and all of the LCoS models are physcially larger (pico projectors notwithstanding).
The not-quite-recessed lens is mounted off center - too the right of center if you are facing the projector. Nearby (top right corner) is the front infra-red sensor for the W1200's remote control. That pretty much all there is on the front, besides the logo, and the button (bottom center) which releases the drop down front foot. More on that later when discussing lens shift.
That lens is a 1.5:1 manual zoom. That's more placement flexibility than found on most lower cost DLP projectors where a very lmited 1.2:1 is the most common. This gives the W1200 a bit more range in terms of placement flexibility, and having that much range even offers a manual solution to using a Cinemascope shaped screen. 1.5:1 is good. true, some others get out to 2:1, or even 2.1:1, but even among the LCoS and 3LCD designs 1.5 is respectable.
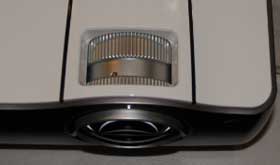
The top houses the focus and zoom rings (also recessed) for the lens. They are located just behind the lens itself. The control panel (discussed below) is located in the center back. The projector does not have any adjustable lens shift, only keystone correction (best avoided if you can).
Venting is handled primarily on the side. This allows the BenQ W1200 projector to be placed on a rear shelf, although projectors without lens shift have to be placed fairly low, or mounted upside down (as is done in a normal ceiling mount). More than likely, owners will either set the W1200 projector on a table for viewing, or have it ceiling mounted.
Vents are on the left and right. The W1200 blows the most warm air out the right side slightly toward the front. Best not to be sitting right in its path less than two feet away.
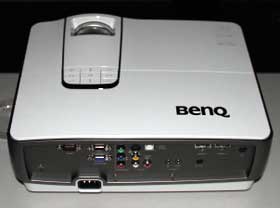
Moving to the back - you find the input panel. The W1200 is reasonably well endowed for its price range, but that too, is covered below.
Only one of the two rear feet is adjustable. That did not make me happy, and that too, will be discussed below.
Click to Enlarge.So close
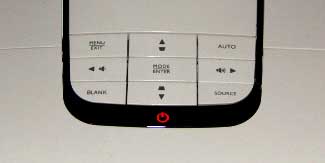
The control panel is located on the top of the projector behind the lens. The power switch is on the bottom black bar (lit up in red). There are four arrows in a diamond formation, and in the center is the enter control. The top and bottom arrows double as keystone adjustment controls, and the left and right arrows also control volume. The top left is a "menu exit" control, "blank" blanks the screen, "auto" is an auto setup primarily used for hooking up to your computer, and "source" is to change between sources such as HDMI, etc.
 Click Image to Enlarge
Click to Enlarge.So close
Rather nicely equipped, the W1200 home theater projector has two HDMI inputs (hdmi 1.3). There's a standard Computer VGA connector for analog computer (HD15), three color coded RCA jacks for component video, an RS232 serial port, a USB, and two sets of audio inputs and an audio output.
And if all that wasn't enough, BenQ even packed a 12 volt screen trigger in for good measure.
Click to Enlarge. So close.
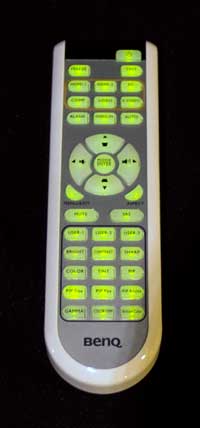
The remote is really nice. It's primarily white so it's easy to find in a dark room. The backlight is very bright - a green-yellow, but not blindingly so. Buttons are mostly small, but well organized, and in different shapes, making it a fairly easy remote to learn.
Any button lights up the remote's back light.
The top right button is power (once for On, twice for Off). The next row - left is Freeze, and the right is Test.
The next two rows are Input buttons, so you can jump directly from any one source to another.
Below that is the usual navigation buttons in a round formation, with a center Enter function. When not using the menus, the left and right arrows control volume, and the up and down arrows, keystone correction.
To the bottom left and right of the nav are the Menu/Exit button and the Aspect ratio button (each are semi-circular). The next row is Mute and SRS (simulated surround sound).
The next two rows are your Image presets (Cinema, Dynamic, User 1...), and below them, nine buttons with direct access to features including: Color, Tint, PIP, Gamma, and Color Temp.
 Click Image to Enlarge