Canon LV-8310 Setup and Menu
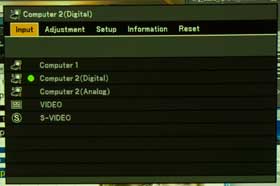
Menu - Input
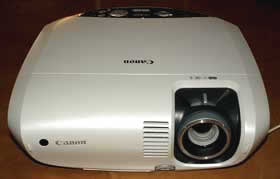
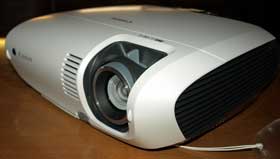
In a pleasant departure from the square case of most projectors, the Canon LV-8310 has a nice sleek look with all the edges rounded. Its lens offset to the right side of the projector when facing it. The lens is slightly recessed from the front panel, such that when the lens cover is on, it is essentially flush with the rounded front panel. There is a focus ring around the lens and a lever to zoom the lens right behind it. There is the usual button release for the front height adjustment foot right in the center and a sensor for the remote on the front left.
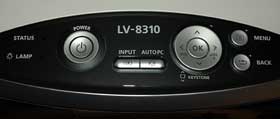
The top of the projector is also a cover for the lamp. There are release buttons inset on each side of the projector that, when pressed with a flathead screwdriver, allow for removal of the top cover. This allows the user to access the lamp when the LV-8310 is ceiling mounted, without having to unmount the projector. Just behind the removable cover, at the rear, is a control panel with the most oft-used functions, plus indicators for projector and lamp status. There are buttons for Power (which includes and indicator light in the center), Input selection, AutoPC (for automatic adjustment to an analog RGB source), Menu, Back, Navigation (Up, Down, Left, Right and Enter) and OK (for menu item selection). The Left and Right menu navigation buttons also function to adjust the volume of the built-in speaker and the Up and Down menu navigation button also function as keystone adjustments.
On the left side of the projector (facing the front), there is the built-in 7-watt speaker toward the front and a hot air exhaust vent toward the rear. On the right side of the projector is a cool air intake vent (which is also the cover for the dust filter and a Kensington lock toward the rear.
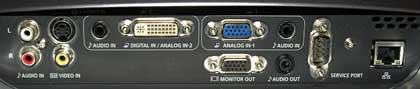
Moving to the rear panel, starting at the top left, there are stereo audio input jacks, followed by S-video and composite video inputs. They are followed by a single audio input mini-jack and a DVI-I digital/analog input. Next up is an analog RGB input and monitor output, followed by an RS-232 port for service or control and a RJ-45 LAN port. Below the panel is a second air intake and filter cover on the left and a main power connector jack and switch on the right. The right rear foot is adjustable for height, but the left one is not. The rear of the projector case extends out and around to form a nice carrying handle.
The Canon LV-8310 fires up very quickly and has a readable image on the screen in seconds. The short-range 1.2X zoom is somewhat disappointing as it doesn’t allow much flexibility in placement distance from the screen. Some competing LCD projectors have much greater zoom ranges, although, in fairness, 1.2:1 zooms are probably the most common. The front adjustment foot makes it easy to set the projector to the correct height, but with only one rear adjustable foot, it’s harder to avoid the use of keystoning.
Once setup, the user can select the desired picture mode from the on-screen menu and the usual range of adjustments can be made. Unlike some of its competition, the LV-8310 includes selectable gamma and color temperature. This can help optimize the projector’s display depending on room lighting conditions. For the advanced user, it also has RGB grayscale adjustments. One nice feature not always found in this projector class is the ability to make the full range of adjustments to any image mode.
Below are photos of most of the Canon projector's major menus.
Additionally, you can set up the projector to provide a good-looking color balance depending on the color of the projection surface. In the General menu, by going to Screen Color, you can select from Off (for normal white projection screens), Whiteboard, Greenboard, Greenboard (Gray), Light Yellow, Light Green, Light Blue, Sky Blue, Light Rose and Pink. This allows the presenter to use almost any open wall area as a projection surface.
Menu - Input
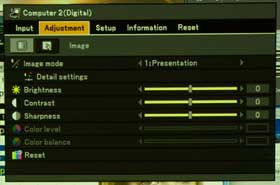
Menu - Adjustment
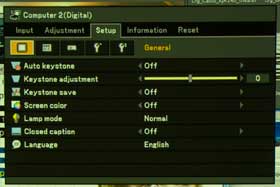
Menu - Setup General
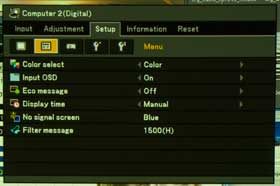
Menu - Setup Menu
The LV-8310’s remote control is small with a minimum of buttons that are well laid out. Canon’s done a nice job of sticking to the most important buttons which results in a clean look to the remote. Buttons are nicely grouped, with the Power button in green on the top left and volume, digital zoom and picture freeze buttons by themselves on the bottom third of the remote. There are also buttons for the usual menu access and navigation, as well as buttons to select the input, aspect ratio, access the image adjustments, autosyncing, bringing up the information screen and blanking the display.
As is typical for this class of projector, the remote’s buttons are not backlit or even glow-in-the-dark. However, as the Canon remote has fewer buttons and better spacing than many of its competitors, the remote is easy to use by touch.