Projector Reviews Images

Epson Brightlink 1485Fi Business/Education Projector Review-Special Features 2

Posted on April 28, 2021 by Philip Boyle

Epson Brightlink 1485Fi Business/Education Projector Review - Special Features 2: 3 LCD, Aspect Ratio,Auto Image Adjust, Improved Cable Management, PC Free Functionality

3 LCD

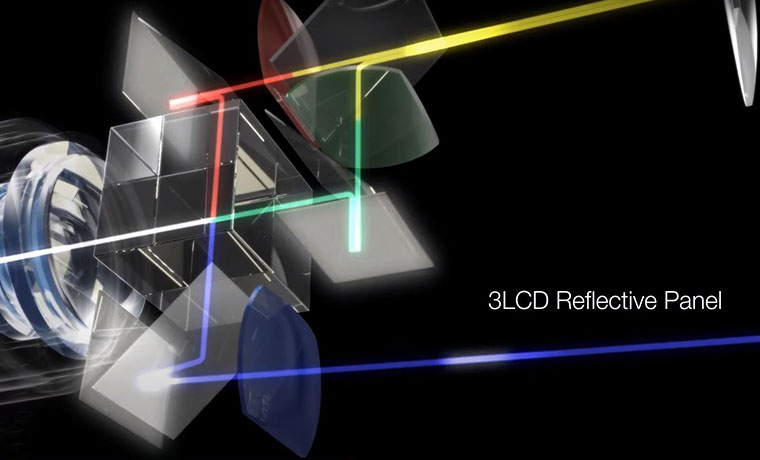
The Epson Brightlink 1485Fi is a 3LCD projector rated at 5,000 lumens which is more than enough to produce a good quality picture on screens up to 120”.

As with all Epson 3LCD projectors, The Brightlink 1485Fi produces as many color lumens as it does white lumens, which ensures bright, vibrant color, critical for good picture quality.

3LCD projectors are an incredibly large part of the current projector market. They make up well more than half of all projectors manufactured in 2020. 3LCD dominates just about all categories of projectors, except the extreme high-end (3 chip DLP) and the incredibly small Pico projectors.
The Brightlink 1485Fi features a solid-state optical design with no moving parts (unlike DLP). The panels (or chips, as they are also called) have been all transmissive LCD panels. That is, light passes through the panels. Most recently, Epson started manufacturing an “R” series, but until I read more about their design, they sound more like LCoS than LCD, so the “R” series may or may not fit into the traditional 3LCD definition.

Aspect Ratio

The Brightlink 1485Fi Interactive Laser Display, the latest in Epson's line of award-winning displays for modern classrooms. With a massive 100" wide display and unique split screen capabilities, the 1485Fi offers nearly two times the display size of standard 75-inch panels.

The Brightlink 1485Fi can also support a massive 16:6 display at over nine feet wide. This is nearly two times the display area of a 75-inch flat panel, and because Brightlink displays can be used on a typical whiteboard, you don't lose valuable classroom or meeting room whiteboard space when the display is not in use. The whiteboard is still available when you shut off the Brightlink. Try doing that with a flat panel.

Auto Image Adjust

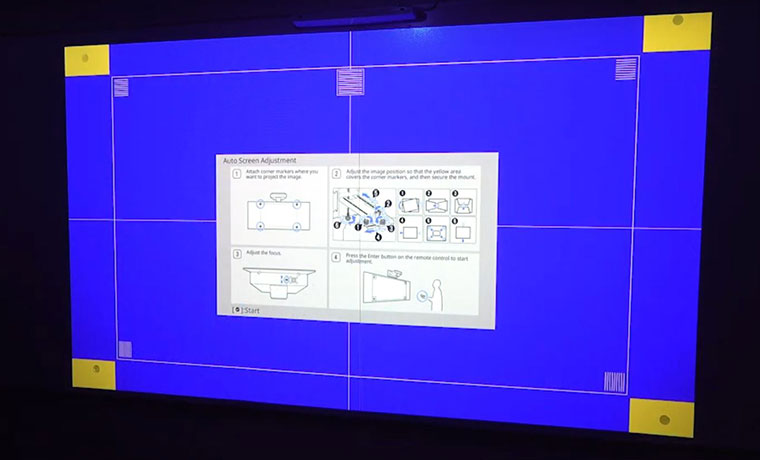
After you’ve done the initial setup of the Epson 1485Fi, and you find yourself needing to further improve the image alignment, Epson has provided a really handy built-in tool that can help you quickly and easily get the alignment done. I’m talking about Epson’s Auto Image Adjust feature.

Automatic screen adjustment on the 1485Fi is as simple as pressing the Menu button and selecting the Installation option where you will have the option to start the Auto Screen Adjustment feature. Epson provides four magnetic dots along with the accessories for the projector. These very important accessories can be easily overlooked or confused for something else, so be careful. Once Auto Adjustment is selected, four yellow boxes will appear in the corners of your screen or whiteboard. Simply place one of the four included calibration markers in each of the projected yellow boxes. Make sure the markers form a level rectangle and press Enter to finish the process. After a few seconds, the image will automatically adjust to fit your screen and you can remove the markers.

Improved Cable Management

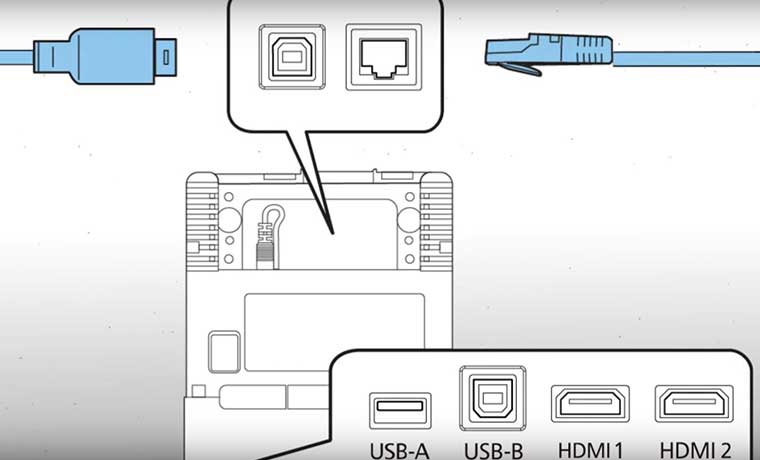
The included outboard HDBaseT transmitter box allows easy transmission of audio/video content over long distances via a single CAT-6 Cable, simplifying installations. This means no tangle of wires running from various sources up to the projector. Equipped with two HDMI, and USB-A/B inputs, the HD-Base-T transmitter also allows simple source-switching as well as Power ON/OFF functionality for projectors. You can easily plug in external sources without having to get to the 1485Fi back panel.

The outboard transmitter box allows users to power the projector on and off, switch HDMI sources and send audio/video content over a single CAT-6 cable.

PC Free Functionality

One of the things that intrigues me about the Epson 1485Fi is the fact that you don’t need to connect a computer or video device to the projector to annotate, or draw on content. You can perform these functions by using the projector's built-in Whiteboard Mode or PC Free Annotation Mode. The Whiteboard Mode allows you to write or draw on the projection screen just as you would on a chalkboard or dry erase board; built-in backgrounds are also available with the Whiteboard Mode. The Brightlink 1485Fi PC Free Mode allows users to annotate with or without other devices connected to the projector. Be aware that the projector's built-in tools do not provide the same features as using the Epson Easy Interactive Tools software, but they are still a powerful set of tools available to both moderators and participants.

To switch to PC Free Annotation Mode, use the remote control to select an unused input source. If you cannot annotate on the unused input source, make sure the Drawing Function setting in the Interactive menu is set to On. You should see a toolbar at the bottom of the projection screen. This toolbar allows you to draw and write on the screen.

Latest Reviews

February 25, 2024

Introducing the Hisense C1: A cube-shaped 4K UHD lifestyle projector with an RGB triple laser light source and integrated JBL ...

February 19, 2024

The BenQ X3100i is a 4LED, 4K UHD (3,840 x 2,160p) 0.65" DLP short-throw gaming projector that offers a BenQ-rated ...

© 2024 Projector Reviews

crossmenu linkedin facebook pinterest youtube rss twitter instagram facebook-blank rss-blank linkedin-blank pinterest youtube twitter instagram