Appearance
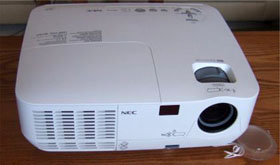
The NEC NP216 has a white plastic case, with nicely rounded corners. Starting with the front panel, the lens is recessed on the right side of the front face, which keeps it protected even without its lens cap (which, like many projectors, is tethered to the projector). Just behind the lens, in a recess in the top of the projector, is a focus adjustment ring and tabbed zoom lever. There is an IR receiving eye just to the left of the lens. There is one front height adjustment foot in the center with the usual push-button release. There is also one screw adjustment foot in the left (while facing the front) rear, for helping to square the image horizontally. Overuse of the front adjustment foot will result in the need for excessive keystone adjustment, so table mounting should be on a fairly level surface that’s at or near the correct height to vertically align with the screen. The left side of the front face consists of a large heat exhaust vent.
Moving to the top of the projector, facing it from the front, there is a cover on the left side for accessing the lamp. This makes for easy lamp replacement if the projector is ceiling mounted, as you wouldn’t have to unmount the projector to replace the lamp. In the right rear corner is a control panel with the normally used functions. These include indicators for power on, lamp and status (for warning of projector problems like overheating). There are buttons for Power, Source and Auto Adjust (which optimizes the display of a computer image). These are followed by buttons to bring up (Menu), select from (Enter) and Exit the on-screen menu, as well as menu navigation (Up, Down, Left, Right) buttons. When the Menu is not displayed, the Up and Down buttons function for Keystone +/- adjustment and the Left and Right menu navigation buttons function as Volume Down and Up respectively.
On the side (again facing the front of the projector), toward the front, is a security lock bar to attach a chain to prevent theft. There is also a Kensington lock and air intake vents on this side. The only things on the right side are two air intake vents.
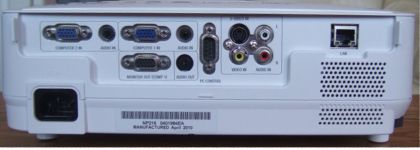
On the rear panel, moving from left to right across the top, are two standard VGA computer inputs, each with a corresponding 1/8” stereo audio jack. Just below that is a VGA computer output and audio output jack. Next is an RS-232 port (for computer control of the projector), followed by S-video and composite video jacks. Continuing on, there are RCA-type stereo audio jacks to pair up with the S-video or composite video inputs. Finally, there is a LAN jack for a network connection. Along the bottom of the rear panel is the power cord connector on the left and the 7-watt built-in speaker on the right.
It should be noted that like most DLP projectors, there are no dust filters to be cleaned or replaced. This, along with the lamp cover being accessible from the top, makes it easy to maintain the NP216, even if it’s ceiling mounted.
NEC NP216 Setup and Menus
Setting up the NP216 is quite simple. As is the case with most DLP projectors in the NP216’s class, zoom range is very limited. So, if you’re going to be using the projector on a stationary desk or table, you’ll want to consult the user guide to find out how far the projector needs to be from your particular screen. Image height can be quickly adjusted with the front adjustment foot and the projector can be leveled from side-to-side by adjusting the single, rear adjustment foot. While we’d prefer to see two rear adjustment feet to properly level the projector from front to back as well, having the one foot can make up for uneven surfaces. If the front height adjustment is kept to a minimum, keystone correction can be applied from the remote to square the image to the screen with minimal edge distortion. We typically recommend that if you have to use keystone adjustment, you should keep it to a minimum to avoid unwanted picture distortion and the NP216 is no exception.
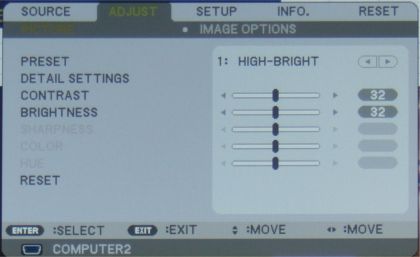
Bringing up the menu, the user first selects the source (if he or she hasn’t already done so), then goes to the “Adjust” screen to choose the desired picture preset and then make the usual adjustments (contrast, brightness, sharpness, color and hue) to the picture. In addition to the usual adjustments there are a number of other adjustment options not always seen in this price range. These include a choice of six different color temperatures, three levels of gamma correction, two Brilliant ColorTM settings and Dynamic Contrast. While many users may not have a need for these adjustments, they can come in handy presenting images with dark scenes (where the proper gamma setting and dynamic contrast can improve shadow detail) or with whites that look too red, blue or green (color temp). All of the settings can be stored in any one of six Preset modes, allowing the presenter to select a mode that fits best with his or her particular presentation. This level of control is not often seen in this class of projector, and is a welcome feature of the NP216.
If you’re not using a screen, the NP216 has settings for a plethora of surface colors. In addition to the usual Blackboard setting, there are also color profiles for Gray Blackboards, Whiteboards, Light Yellow, Light Green, Light Blue, Sky Blue, Light Rose and Pink surfaces. This allows for better balanced colors with any surface.
NEC NP216 Remote Control
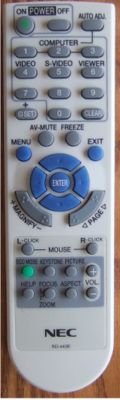
The NP216’s remote control is a small, nicely laid-out remote with mostly gray buttons. The Power button has a green icon on it and there is a separate green button for putting the lamp into Eco mode. Menu access and navigation buttons are blue. This makes it easy to access these often used buttons in minimal lighting without resorting to backlighting, which can be distracting during presentations. Buttons are appropriately grouped and allow access of many of the important functions without going to the menu. For example, while many projector remotes allow for scrolling through the various inputs, the NP216 remote allows the user to individually selecting each video input. There are also buttons for paging through a presentation and for the remote to act as a computer mouse (when using the optional remote mouse receiver). Also, scrolling through Picture modes and switching aspect ratios can be performed on the remote. There are also buttons for Auto Adjustment, image freezing, audio volume and AV mute, digital zoom, help, P-timer and keystone correction. One nice feature of the remote is the ability to set a Control ID for the projector, enabling a user to control multiple NP216 projectors independently from a single remote.
Overall, the level of access and control available with the NP216 remote is very good and exceeds that of many competitors. Some of the buttons are a bit small and hard to read in dim lighting, but that is normal for a multimedia projector remote.
 Click Image to Enlarge