Appearance
As you might expect from a computer manufacturer, the Dell 1610HD has a clean, high tech look to it. It’s got a matte black plastic case with squared-off edges and gray trim on part of the top edge and around the lens. Starting with the front panel, the lens slightly projects from the right side of the front face and is surrounded by a focus ring with a tethered lens cap. The lens extends to the rear and in an opening on the top of the projector, is a tab for zoom adjustment. There is an IR receiving eye just to the left of the lens. Also to the left of the lens are an exhaust vent and one front height adjustment foot in the center with the usual push-button release. Two rear, screw-height adjustment feet are a welcome addition, as they provide the opportunity to keep the projector level, thus minimizing or eliminating the need for keystone correction.
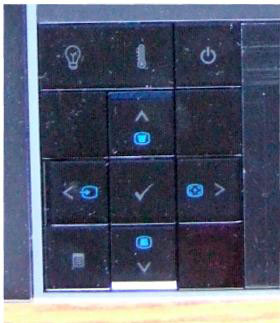
Moving to the top of the projector, in the center along the rear edge, is a control panel with the normally used functions. This control panel consists of square, flush buttons, which have little separation and are the same color as the rest of the case. While this provides a very clean look, it is near impossible to use in a darkened room. This is not a big deal as most people will use the remote, but I still prefer function to form when it comes to control buttons. The panel includes indicators for power on, lamp status and overheating.
There are buttons for Power, Menu and menu navigation (Up, Down, Left, Right) buttons. When not using the Menu, the Left and Right buttons function as Source selection and Auto Adjustment buttons respectively. The Up and Down buttons also function as keystone adjustment buttons. There is also a second IR receiving eye in the bottom right of the button cluster. This is a nice addition as it makes it easier to control the projector via the remote when standing on either side of the projector.
The built-in speaker is on the left side (again facing the front of the projector), and on the right side is mainly comprised of an intake vent. On the bottom of the projector are screw holes for tripod and ceiling mounting, as well as a removable cover to access the lamp. In general, we do not favor having the lamp access on the bottom of the projector, as it will require dismounting of the projector (if it is ceiling mounted) to replace the lamp. On the plus side, there are no dust filters to clean or replace.
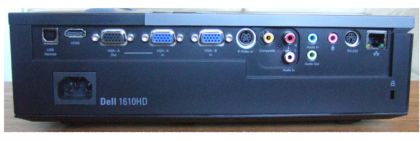
Moving to the rear panel, Dell has provided an extremely complete set of inputs and outputs. Going from left to right, there is a USB port for controlling displayed pages on your PC via the remote. This is followed by an HDMI input, VGA output and input (2) terminals, and S-video input and a composite video input. This full array of video inputs assures compatibility with any video source. Moving on, there are stereo and mono audio input jacks, a stereo audio output jack and a microphone jack. Stereo audio can either be mixed to use the built-in 8-watt speaker or passed through the output jack to an external speaker system. Finally, there is an RS-232 input jack for control via a PC or serial control unit, a LAN jack for network control and monitoring, a Kensington lock and the power cord connector
Setup of the 1610HD is fairly quick. As is typical with DLP projectors, especially those in the 1610HD’s class, zoom range is limited. So, unless you’re using the projector on a movable cart, you’ll need to consult the user guide to find out how far the projector needs to be from your particular screen. However, setup is facilitated by the ability to adjust both front and rear projector height. Having both front and rear adjustment feet is something we like to see on any multimedia projector, which are table-mounted more often than not. This is important as it allows the presenter to either eliminate or at least minimize the use of keystone correction to square the image with the screen. While minimal keystone correction is not likely to cause any noticeable picture degradation, greater use can distort the image significantly. The 1610HD offers both manual and auto keystone adjustment so if you need a quick setup, you can use the height adjustment to get the picture close, then use the auto-keystoning feature to square the image to the screen with minimal edge distortion.
Bringing up the menu, the user can use the Auto Adjust feature (if using a PC input) to sync to a particular PC’s frequency and tracking. Next you go to the Picture menu to choose the desired image mode (a choice between Presentation, Bright, Movie, sRGB and Custom). From there you can make adjustments to Brightness and Contrast (if connected via VGA to a PC) and additionally to Saturation, Tint and Sharpness if connected to a Video source. Another nice feature of the 1610HD is an expanded range of adjustments (Picture Advanced) available to the user in any image mode. These include a choice of three different color temperatures. You can also make adjustments to any of the three color temps, using the red, green and blue custom color adjustments, and the result is saved as a Custom color temp.
There are also settings for white intensity and color space. While many end users may not be able to make proper use of the color temp adjustments without test equipment, they can still improve the picture by adjusting them with whites that look too red, blue or green. Overall, the menu is simple to navigate and affords the user the proper amount of control over the projected image.
One feature that many portable projectors have that is lacking in the Dell 1610HD is the ability for instant shutoff (which enables the user to disconnect the projector immediately without waiting for a cool down period.
Dell 1610HD Remote Control
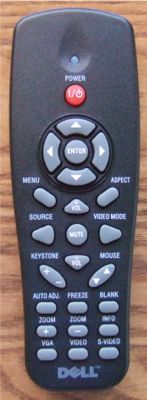
The 1610HD’s remote control sports a clean, functional layout with a black case and gray buttons (except for the Power button which is a bright red). Buttons are appropriately grouped with menu access and navigation functions right below the Power button at the top of the remote. In addition to a Source button for scrolling through inputs, there are also individual buttons for accessing VGA, S-Video and composite video sources individually. Oddly, there is no button to directly access the HDMI input. Buttons to page up and down through a presentation on a PC if a USB cable is connected between the projector and the PC are a nice touch. There are also buttons for Auto Adjustment, image blanking and freezing, video mode, audio volume and mute, aspect ratio, digital zoom, info and keystone correction.
To avoid the potential distraction that can occur with a lighted remote, the buttons are not backlit or even glow-in-the-dark. However, the clean and well-spaced layout makes it easy to use the remote in darkened rooms.
 Click Image to Enlarge