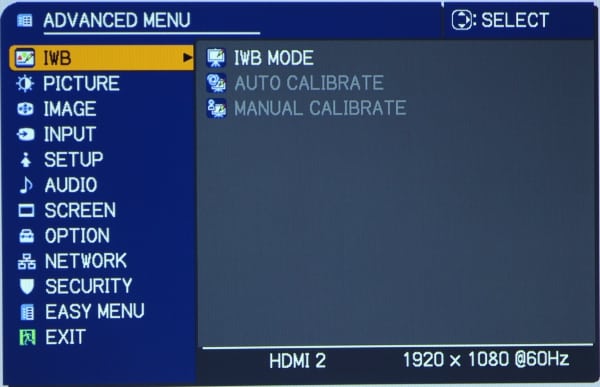
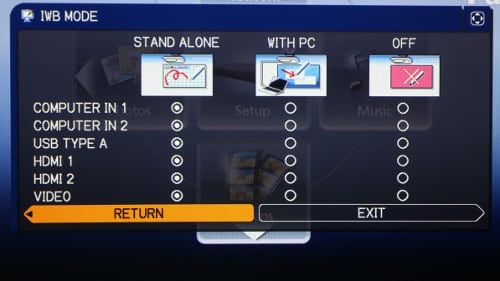
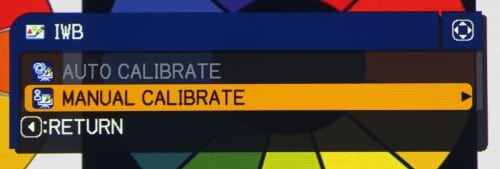
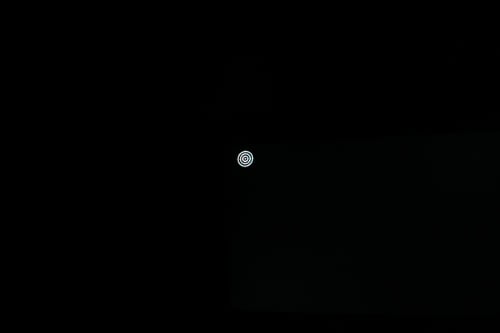
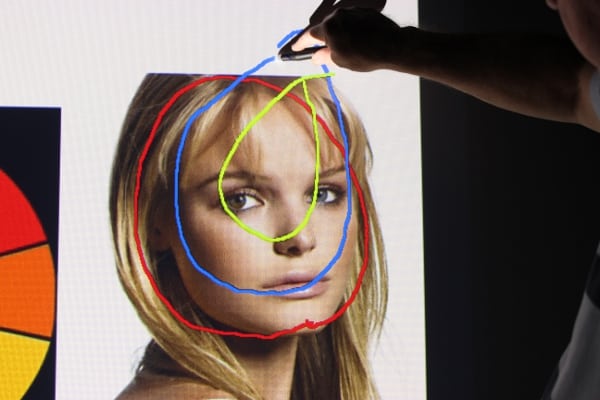
Hitachi CP-TW2503 Projector Review – Interative Setup & Use Posted on August 27, 2014 By Ron Jones 1. Hitachi CP-TW2503 Projector Review - Hitachi CP-TW2503 - Overview - Hitachi CP-TW2503 - Highlights2. Hitachi CP-TW2503 Projector Review – Special Features - Hitachi CP-TW2503 - Ultra Short Throw - Hitachi CP-TW2503 - Wired and Wireless Networking - Hitachi CP-TW2503 - Interactivity - Hitachi CP-TW2503 - Presentations without a Computer - Hitachi CP-TW2503 - DICOM Simulation - Hitachi CP-TW2503 - Extensive Image Options and Adjustments3. Hitachi CP-TW2503 Projector Review – Hardware Tour - Control Panel - Signal Connector Panel - Interactive sensors - Remote Control4. Hitachi CP-TW2503 Projector Review – Hardware Tour 2 - The "Easy Menu" - Advanced Menu - Network Menus - Summary5. Hitachi CP-TW2503 Projector Review – Interative Setup & Use6. Hitachi CP-TW2503 Projector Review – Picture Quality - Picture/Color Modes - Picture Quality - Image Sharpness with Text - Image Contrast - Bottom Line on Picture Quality7. Hitachi CP-TW2503 Projector Review – Performance - Brightness - Audible Noise - Sharpness - Audio Performance8. Hitachi CP-TW2503 Projector Review – Summary - Picture Quality - Feature Set - The Bottom Line9. Hitachi CP-TW2503 Projector Review – Warranty10. Hitachi CP-TW2503 Projector Review – Pro and Cons - Pros - Cons11. Hitachi CP-TW2503 Specifications HITACHI CP-TW2503 PROJECTOR: Setup and Use of the projector’s Interactive Features, called IWB by Hitachi, are described in this section. Hitachi refers to the interactive functions as IWB, which may stand for “Interactive White Board”, but that’s just my guess. Before the IWB function can be used it must be setup and that can be done through the projector’s Advanced Menu (shown below). From this menu select “IWB Mode” and from the IWB Mode menu that is then displayed, as seen in the photo below, turning on the IWB function with the desired operating mode (i.e., either standalone or connected to a computer) and for the specific video input being used (e.g., HDMI-1, HDMI-2, etc.). Note: Once you have completed this initial setup of the IWB function you can select the IWB Mode, including turning IWB on or off, for the current video input by pressing the IWB button on the remote. Next the interactive pen location must be calibrated to the screen positions. This can be done using automatic calibration or manual calibration (see IMB menu below). Note that the automatic calibration function is only available when the projector has been connected to a computer, via HDMI or VGA and also via USB, and set to operated in the “with PC” IWB mode (see above). Manual calibration must be used when the projector is operated in “standalone” IWB mode. When manual calibrate is selected, the projector displays a series to 16 calibration images with each having a “bullseye” target (as shown in the photo below) that the user must touch the tip of interactive pen against. Each screen has one point indicated and the 16 images identify 16 calibration points placed in a 4 x 4 grid across the screen surface. Note: After doing the manual calibration, I found the accuracy of the light pen position relative to the image to be excellent with under 1/2 inch difference between drawing location and the actual pen position. Finally, when you are ready to start to use the IWB function for drawing (I used the standalone mode) you can popup the drawing menu, as shown below, to select such things as line drawing and color. Finally you are ready to go. The projector is supplied with two pens and up to four total can be used at one time, meaning up to four people can the drawing on the whiteboard at one time. Below is an example of my simple line annotations over one of our standard test images. 1. Hitachi CP-TW2503 Projector Review - Hitachi CP-TW2503 - Overview - Hitachi CP-TW2503 - Highlights2. Hitachi CP-TW2503 Projector Review – Special Features - Hitachi CP-TW2503 - Ultra Short Throw - Hitachi CP-TW2503 - Wired and Wireless Networking - Hitachi CP-TW2503 - Interactivity - Hitachi CP-TW2503 - Presentations without a Computer - Hitachi CP-TW2503 - DICOM Simulation - Hitachi CP-TW2503 - Extensive Image Options and Adjustments3. Hitachi CP-TW2503 Projector Review – Hardware Tour - Control Panel - Signal Connector Panel - Interactive sensors - Remote Control4. Hitachi CP-TW2503 Projector Review – Hardware Tour 2 - The "Easy Menu" - Advanced Menu - Network Menus - Summary5. Hitachi CP-TW2503 Projector Review – Interative Setup & Use6. Hitachi CP-TW2503 Projector Review – Picture Quality - Picture/Color Modes - Picture Quality - Image Sharpness with Text - Image Contrast - Bottom Line on Picture Quality7. Hitachi CP-TW2503 Projector Review – Performance - Brightness - Audible Noise - Sharpness - Audio Performance8. Hitachi CP-TW2503 Projector Review – Summary - Picture Quality - Feature Set - The Bottom Line9. Hitachi CP-TW2503 Projector Review – Warranty10. Hitachi CP-TW2503 Projector Review – Pro and Cons - Pros - Cons11. Hitachi CP-TW2503 Specifications Hitachi CP-TW2503 Projector Review – Hardware Tour 2 Hitachi CP-TW2503 Projector Review – Picture Quality