Image menu
Image menu, and to the left of the Image Menu choices
The first, nice thing about the Epson menus, is that all the main menus are visible, while you are looking at any of the first level of sub-menus. On the right, you can see the Image menu, and to the left of the Image Menu choices you can see all the other key menus: Image, Signal, Settings, Memory, Info and Reset. The menu is partially translucent, which is always nice. Even when I put these translucent menus in front of a very "busy" scene, they remained easily readable (some menus that are even more translucent can get tough to read at times.
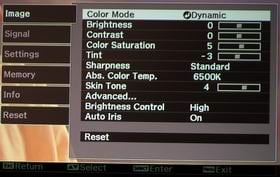
Image menu, and to the left of the Image Menu choices
Offers all the control any "tweaker" would want.

select from 5 preset gamma's including the "ideal" 2.2 gamma.

more sophisticated RGBCMY submenu allows you to control the color balance
Signal menu controls aspect ratio, Noise reduction
Moving to the Settings Menu, from here you have a lot of control of the hardware, including a Sleep mode, password protection (Child Lock)
The Picture menu first gives you a choice of color presets, including Dynamic - the brightest - Living Room, almost as bright, slightly better color, then Natural, Cinema, and x.v.Color. Also on the Image menu is a Skin Tone control. Best skin tones seem to be with settings of 3 or 4.
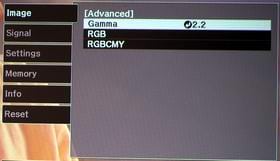
The Advanced sub-menu in the Image menu, offers all the control any "tweaker" would want.
The three options here, are a Gamma menu, which let's you select from 5 preset gamma's including the "ideal" 2.2 gamma.
You can also create your own gamma curve, essentially the equivalent to an audio equalizer, but it let's you control the relative brightness separately of the darkest, more moderate and brightest areas, with a total of 9 separate brightness bands.
For adjusting white balance (grayscale calibration), the RGB sub-menu gives you lots of control, with separate bias and offset for each of Red, Green, and Blue.
The even more sophisticated RGBCMY submenu allows you to control the color balance individually for the three primary (red, green, and blue), and secondary (cyan, magenta, and yellow). A moment to explain. Using the RGB menu, you can adjust the projector to as close as possible to the ideal 6500K temperature for movie watching. Even if you get that perfect, it doesn't guaranty that individual colors are right on the money. For example Red, could still look a little to orangish (which means it has some yellow content), and so on. With this control, you can adjust the individual colors, and even their intensity (saturation).To do this properly you need some good equipment, or an artist's eye and understanding of color.
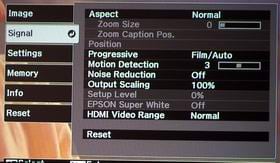
The Signal menu controls aspect ratio, Noise reduction, Overscan control (Output Scaling) and noise reduction.
Speaking of color temperatures, the Absolute Color Temp control offers a slide bar so you can move the color temp up or down by increments of 500K (Kelvin)
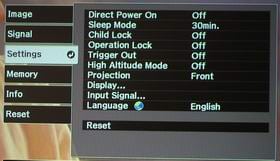
Moving to the Settings Menu, from here you have a lot of control of the hardware, including a Sleep mode, password protection (Child Lock), control of the Trigger for raising and lowering properly equipped, motorized screens. You can also set the projector for front projection, rear, ceiling mount or tabletop.
The Info Menu (not shown, tells you about the signal source, lamp hours, etc. There are no controls on that menu.