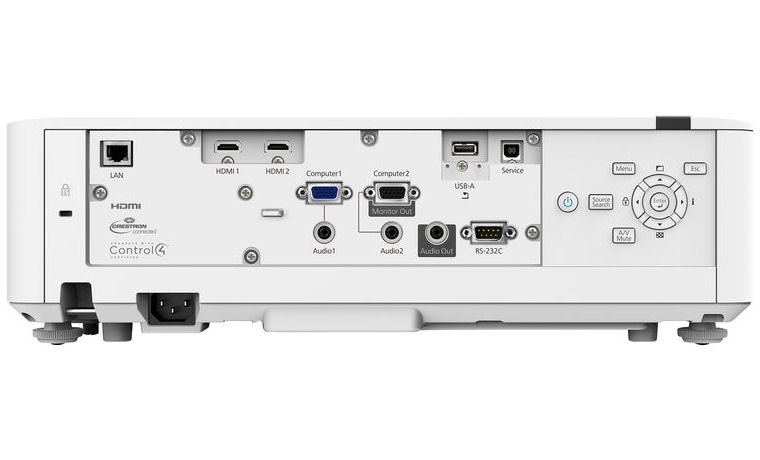
While the Epson PowerLite L400U offers only a handful of inputs and connectors, they should be adequate for just about any business or higher education application. What the L400U lacks in connectors, it certainly makes up for with Crestron and Miracast – offering network connectivity to smart Android and iOS devices through Epson’s free iProjection app.
Speaking of networking, now is as good a time as any to state that wireless networking is not built in to the L400U. There is a decent networking menu that supports wireless, but wireless connectivity only comes by way of an optional wireless module. If you prefer to use a wired network connection, the first connector on our tour, in the upper left corner of the input panel, is the RJ-45 network port. To the immediate right, we find two HDMI ports. Though not clearly labeled on the projector itself, the L400U does have one HDMI port that supports MHL – at least, according to Epson’s website specifications for this projector; I couldn’t find any mention of it in the user manual so good luck, there’s a 50/50 chance you’ll get it right the first time. I, unfortunately, didn’t have a way to test it myself.
Next up, we have Computer 1 – a VGA input with its own Audio input. To the immediate right we have something that may confuse some folks – Computer 2 “Monitor Out” and Audio 2. After digging through the user manual I was able to find that this port can be and input OR an output. Simply change the Monitor Out Port setting in the projector’s Extended menu.
Next we find Audio Out, a 3.5mm MiniJack with an obvious purpose. A USB-A port that supports mass storage devices or that optional wireless module we talked about earlier. A USB type B port for Service, and the obligatory RS-232C port for legacy command and control. We also find the A/C power input in the bottom left corner, a metal locking bar for security and a Kensington lock port on the left, outside of the input panel for added security.