Quick Start Settings
(UPDATED 1/28/2015) Let's face it when you get a new projector you will be anxious to get it up and running quickly. Besides that, the UHP lamps used in projectors, such as the JVC RS600U, take up to 100 hours of use for their colors to stabilize. Therefore, its generally better to wait to get those hours of use on the lamp before doing your own (if you have the technical skills and calibration tools), or are paying for a professional calibration. In this section I'll offer suggestions for three alternative initial setup options for viewing 2D video (configurations 1 thru 3 below) while configuration 4 below offers a suggestion for an initial a setup for viewing 3D video. You should be able to configure you JVC projector for any of these configurations and that should get you up and running with a reasonably good picture with just a few minutes effort.
Configuration 1 Settings - Quick Start using THX Picture Mode
If you want to get a really quick start for watching for HD or 4K video then just set the Picture Mode to THX the make the following adjustments to the user controls (otherwise use the factory default settings for THX Picture Mode):
Picture Adjust Menu - Set the Contrast and Brightness adjustments each to 5.

Picture Mode Submenu - Click on the Picture Mode item, shown in the above Picture Adjust menu, to display the Picture Mode Sub-menu as shown below. Set Clear Black to "Low", then initially set Lens Aperture to "Manual", then adjust its setting to -5 and finally go back to Lens Aperture and change its setting to "Auto 2".
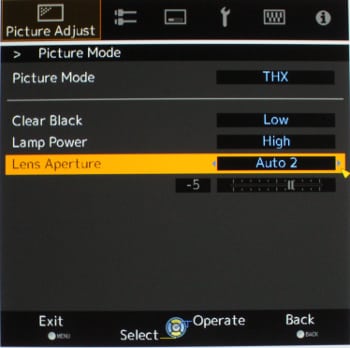
Note: Set Lamp Power to Low or High depending on how bright you desire the picture to be (generally Low should be sufficient for screen sizes up to perhaps 130 inches diagonal with a gain of around 1 when used in a fully light controlled home theater).
Configuration 2 Settings - Moderately Bright 2D Picture
For this mode we will use the User and Custom settings in the projector's menus to set up a configuration that offers good contrast and colors with a moderately bright picture.
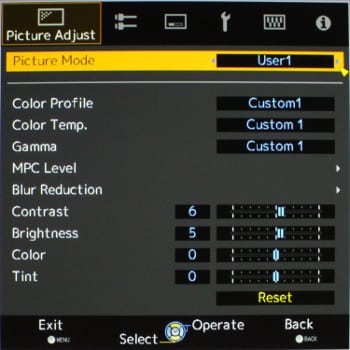
Start with the Picture Adjust menu select the User1 Picture Mode and then set the Contrast and Brightness Adjustments to 6 and 5 respectively as shown in the photo below.
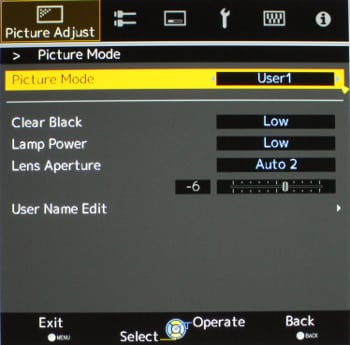
Next click on Picture Mode in the Picture Adjust menu to display the Picture Mode sub-menu as shown below. Set Clear Black to Low (to bring out more details in the darkest areas of the picture), set the Lamp Power to Low then initially set Len Aperture to Manual and adjust its value to -6 then go back and set Lens Aperture to Auto 2
Next set the Color Profile to Custom1 (as shown in the Picture Adjust menu above) then click on Color Profile to display its sub-menu (not shown) where you should confirm that Color Management is set to OFF.
Back on the Picture Adjust menu select Custom1 for Color Temperature then click on this item to display the Color Temperature sub-menu (not shown) and just set the Correction Value to 6500K and leave the other settings at their default values.
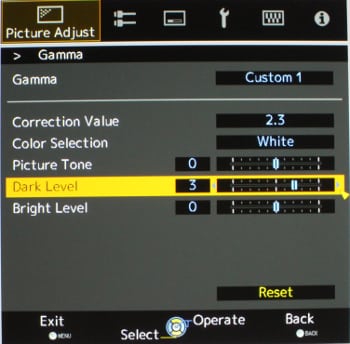
Next down on the Picture Adjust menu select Custom1 for Gamma then click on this item to display the Gamma sub-menu, as shown below. Set the Correction Value to 2.3 and increase the Dark Level adjustment to 2 or 3.
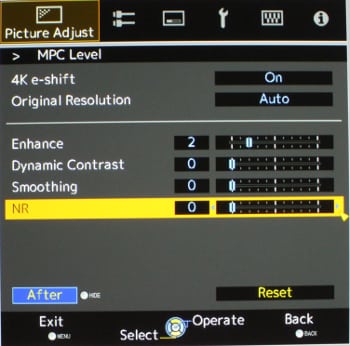
Select MPC Level from Picture Adjust menu to display the MPC Level sub-menu as shown below. The 4 enhancement settings toward the lower part of this sub-menu should be set to zero (0), or in the case of the "Enhance" adjustment it can be set to a low number (2 in the photo) to bring out just a little extra image detail.
The next item down on the Picture Adjust menu is for Blur Reduction and you should select this item to bring up the Blur Reduction sub-menu then confirm that both items on the sub-menu are turned OFF.
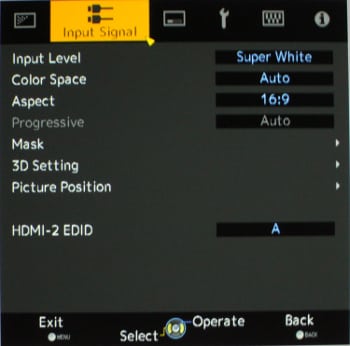
Finally, you will need to move away from the Picture Adjust menu and go to the Input Signal menu as shown in the following photo. On this menu change the Input Level to "Super White".
Configuration 3 Settings - Bright 2D Picture
The idea of this configuration is to provide a really bright picture that still has reasonably goods colors and contrast. You should only really need this much brightness if you are using a really large screen (e.g., 180 inhes) or are using the projector in an environment where you cannot, or do not want to control ambient room lighting. The settings are basically the same as for configuration 2 described above with the the following exceptions.
1. On the Input Signal submenu (shown in the final photo of the section just above) set the Input Level to "Standard"
2. On the Picture Adjust menu set Contrast to 0 and Brightness to +5
3. On the Picture Mode sub-menu set the Lamp Power to "High" then on the same sub-menu set the Lens Aperture first to Manual then the change the manual setting to zero (0) then finally go back and change the Lens Aperture to "Auto 2"
Configuration 4 Settings- Bright 3D Picture
While many new RS600U owners may simply set the Picture Mode to THX and then let the projector lock in the THX setting for Picture Profile, Color Temperature, Gamma, etc., the following settings will produce a substantially brighter 3D picture. In order to make these settings you must first be inputting a 3D signal into the RS600U, such as from a Blu-ray disc player while playing a Blu-ray 3D disc. Once the 3D picture is being displayed, enter the following settings into the projector:
- On the Picture Adjust menu select "Natural" Picture Mode
- On the Signal Menu set the input level to "Standard"
- Back on the Picture Adjust menu set Brightness to +5 and keep Contrast at 0 (zero)
- Click on Picture Mode to display the Picture Mode Sub-menu the set Clear Black to "Low", Lamp to "High" and Lens Aperture to "Auto2" (the manual aperture should show a setting of zero that is greyed out when Auto2 is selected)
- The Color Profile should be set to "3D Video"
- (2/1/2016 update) On the Picture Adjust menu select Custom3 for Gamma then click on this item to display the Gamma sub-menu. Set the Correction Value to 2.3 and set the Dark Level adjustment to 2, with the settings for Picture Tone and Bright Level both set to zero
- On the MPC sub-menu set Enhance to "2" and set Dynamic Contrast, Smoothing and NR all set to zero
- On the Blur Reduction sub-menu set Clear Motion Drive to "Low" and leave Motion Enhance set to "Off"
The above settings were measured to result in a 28% increase in 3D picture brightness, as compared to using THX 3D mode with its default settings.
However, there is one more adjustment that can provide an even greater boost in 3D brightness, as seen through your 3D glasses. That adjustment in located on the Input Signal Menu under the sub-menu for 3D Settings. The adjustment is for 3D Crosstalk and the default setting is zero (0) and, as you increase this setting up to a maximum value of +8, the picture brightness will increase. This adjustment provides a trade-off between the 3D picture brightness and the level of 3D crosstalk/ghosting visible in the 3D image. Now just how high you can set this adjustment and still find the crosstalk level satisfactory will depend on: 1. the 3D source material; 2. the specific characteristics of the 3D glasses you are using; and 3. your sensitivity to 3D crosstalk. For my 3D testing of this adjustment I used a pair of Xpand X105 universal 3D glasses. To my surprise I found that even at the max. +8 setting there was only very minimal visible 3D crosstalk/ghosting while the picture brightness had shot up by a whopping 51%, and that's in addition to the 28% gained above (i.e., as compared to using the default THX 3D settings).
Now none of the above adjustments have attempted to improve color accuracy in the picture nor to correct for any color tint caused by the 3D glasses (this varies by brand and model of the 3D glasses being used). To optimize the 3D color performance would require a professional calibration and that's beyond the scope of this discussion.