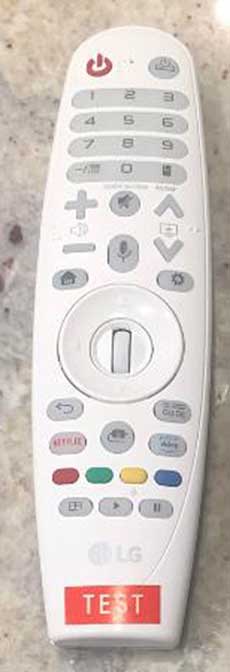
On the other side of the 0, is an icon with an image of a Remote, for that brings up a a digital text menu system along the right side (can be moved to the top), to control the device you have selected, with options like Home, Display, Disc Menu (it knows it’s looking at a player) and, further down the right side, in the case of using the Sony player: The usual player navigation: Fwd, Back, Play, Stop, Chapter forward and Chapter back. They work fine. Taking a little getting used to is you use the Play button on the right, not the usual player’s graphics options at the bottom of the screen – Play, Scenes, etc.
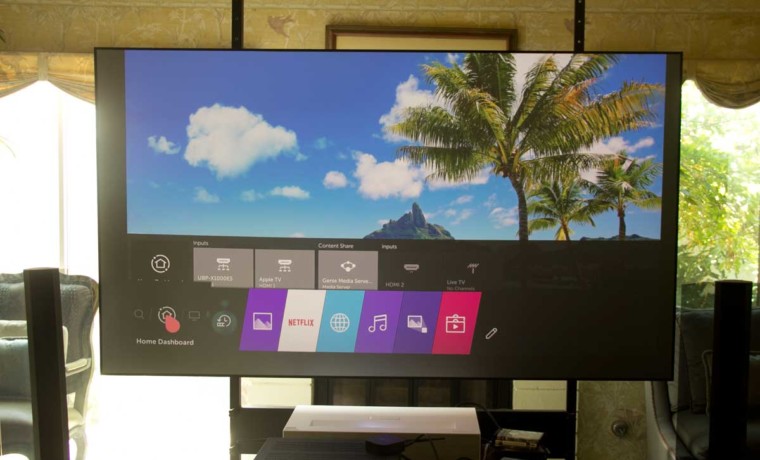
Directly below the 0, is Audio Mute, and to its left are Volume Up and Down buttons; a + and a -. To the right are the Channel Up and Down controls. Right below that is the STB menu, if you have configured the projector to work with your set top box. A Home button sits opposite it. And that brings up the “smart” menu, with apps, inputs, etc. as per this photo.
That takes us to main navigation: The four arrow keys are in a round formation with a thumbwheel in the center – you can scroll with the wheel, or you can press the wheel which will act as an Enter button. No surprises there. Below to the left is the Back button for the menu structure. Opposite it on the right is the Caption button.
Next is a change from the older LG projector’s remote. Instead of a Picture button, there’s a Microphone button, for voice control (LG ThinQ and Google Assistant).
Right below to the left is the Home button, and on the right side is the settings button which brings up the graphic menu w on the left. Of the screen Back is the Picture button which brings up the main projector menu on the right of the screen with small icons. If you want more than the basic controls for any of those settings (Picture, Sound, Aspect Ratio, projector position, and the lowest button takes you to the expanded menu.
For example, you can select from all the picture modes from the simple pull down on the left, but to adjust color, brightness, contrast and a half dozen more things, you need the expanded menu. Same is true for other short options on the left, such as the Sound control. The short menu provides about 8 options, relating to controlling the internal speakers, using Bluetooth or DAC (digital audio out) to control external speakers. But in the expanded menu, for example you can select Auto Volume, which automatically adjusts volume as you channels, so you don’t actually end up with a big, unexpected jump in volume. There’s also AV Sync, should either sound and the picture be slightly delayed compared to the other…
Back to the buttons: Next on the left, is the Back button, which takes you back up a menu…
On the right, is a button labeled Guide. That brings up a generic TV guide – you can provide geographic info to improve it, but it won’t be as accurate, say as your cable box’es guide…
Right in the middle there (but slightly lower om the remote, is a button for selecting the input (TV, HDMI 1, 2, USB, etc. You will find shortcuts to Netflix (left) and Amazon Prime) (right) on either side of the source button.
Almost done. Next row – four small colored buttons – red, green, yellow, blue – most of you have those same four buttons on whatever Blu-ray or Blu-ray UHD player you own. They may be used for different purposes, depending on what device you are also controlling. For example, they could be used for adding, deleting bookmarks, advancing or going back 12 hours in the Guide (that’s a guess, I haven’t tried that, but that’s what the 4 colored buttons do on my DirecTV remote, and on my various 4K and Blu-ray players.
That’s it but for a Play, and Pause button, at the bottom of the remote, and on the right is a button marked Ratio which is a short cut to the Aspect Ratio short menu on the right (choices such as 16:9, 4:3, zoom and stretch).
And let’s not forget the main HU85LA menu, which I only mentioned in passing above. That is the bottom left. It looks like a 2x2 grid. Click on that and the more detailed menu system comes up. In the graphic menu, for example, you can choose a picture mode. But you need that main menu, to adjust a picture mode, such as brightness, color calibration, and turning on features like creative frame interpolation.
The LG remote is responsible for far more than most projectors’ remotes because it is part of a very smart system. At best some typical projectors have HDMI-link to do basic controls of players, etc., but this system goes way beyond that.
Bottom line: I really enjoy using this LG Magic remote control, but I still can’t put away all my other remotes, even if this remote handles much of those others’ most common functions.


