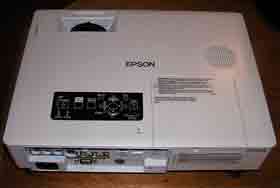
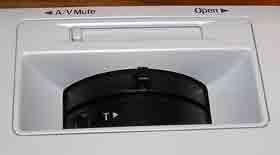
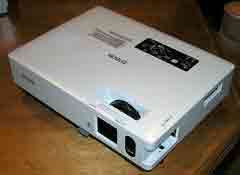
On the top of the projector, immediately behind the lens, is the lens cover door. Closing this door, not only keeps dust off the lens when not in use, but also functions as an A/V Mute, which saves lamp life, when you want to temporarily pause a presentation, and blank the screen.
Immediately behind the A/V Mute door is a recessed area for adjusting lens focus, and behind it, lens zoom.
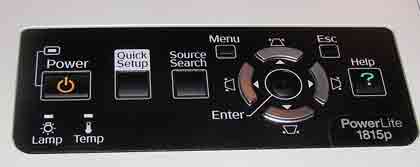
Further back is the control panel, which is nicely laid out. (Looking from the rear), the control panel starts with the Power switch on the left side (and power indicator), and below it, indicator lamps for lamp function and temperature. To the right of the Power button is a Quick Setup button that let's the Epson projector do its thing, including automatic keystone correction. A manual Source search button comes next, and then, the traditional Menu button, and four arrow keys (arranged in a circle). When not in the menu modes, the left right arrow keys control horizontal lens shift, while the up/down arrow keys control vertical lens shift. A small Escape button is off to the top right of the arrows "ring". Esc functions, among other things to move back up in the menu structure. Lastly, on the far right is the Help button. Epson has been offering interactive help on its projectors for at least a hald dozen years. Selecting Help lets you bring up some troubleshooting questions. As you identify what it is you are trying to do, the Epson help system takes you directly to adjustment areas to control that particular item. No need to manually navigate the menus. Using the Help, for example, you can adjust colors, brightness, and any number of additional features. It's always been a nice touch, for getting the projector set up, the way you want it, and for correcting setup problems you may have inadvertantly "messed up."
The control panel, is the lamp door, for replacing the lamp. The door is on the top of these Epson projectors, so, if you have ceiling mounted the projectors, there is no need to unmount the projector to change out the lamp.
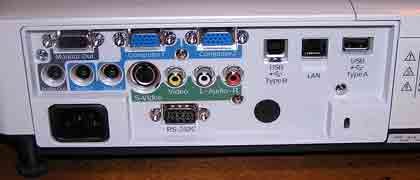
Moving to the back of the Epson Powerlight 1815p and 1810p, will take you to the input panel. These Epsons are pretty well loaded with inputs and outputs, with one exception. Epson does not provide a digital input (HDMI nor DVI), so everything is analog. This was somewhat surprising for projectors otherwise so capable. In truth, of course few PCs even today, come standard with a digital output for video, so few will find this to be a problem. Still, it would have completed an otherwise impressive collection of I/O. Now that I am a MacBook Pro, user, for example, I had no problem interfacing my laptop to the Powerlite 1815p, using the provided converter cable, that plugs into the MacBook Pro's DVI-I output, and allows access to the analog computer signal, but it would have been nice to just output the pure digital, as my laptop is capable of.
The Epson Powerlite 1815p, and moving across the top row, is a monitor output (needed to support use of an external monitor, as a typical desktop PC user woudl have). This is followed by two computer inputs (cleverly labeled Computer1 and Computer2). Further to the right is a USB type B input, a standard Ethernet jack for a LAN (local area network), and a second USB (this time, type A).
Regarding the two USB ports. The type A port would be used for things like a "thumb drive" for displaying images on the projector. The type B port, on the other hand, is for remote mousing functionality - the ability to control your computer presentation from the Epson's remote control, - advancing slides, pointing and clicking, etc.
There is a stereo mini jack for stereo audio output. This would allow you to support external powered speakers, from the selected audio input for the source you are using. Thus you can wire directly from the projector to the speakers, and, as an added bonus, controlling the volume from the Epson remote control, would also allow you to control the volume to the external speakers. This should save significant wiring, and overall installation cost, not to mention, keeping things simple. Next over to the right are the two stereo audio inputs (again, stereo mini jacks), one for the Computer1 source, the other for Computer2. Next comes an S-video and a composite video input. A pair of RCA jacks arelast on this row, and provide the input audio for the video sources.