Projector Reviews Images

BENQ X1300i GAMING PROJECTOR REVIEW-HARDWARE

Posted on February 17, 2021 by Philip Boyle

BENQ X1300i Gaming Projector Review – Hardware: Texas Instruments DMD DLP, Lens, Audio System, Control Panel, Inputs and Connectors, Remote, Menus

TEXAS INSTRUMENTS DMD DLP

Around 2010, Texas Instruments began producing DLP chips that were designed for LED light. By combining red, blue, and green LEDs, manufacturers were able to create projectors that were much smaller and less expensive than traditional mercury lamp based projectors. Their major drawback was that many of these models were not bright enough for home cinema or meeting rooms.

Since then, projectors using LEDs have gotten smaller and brighter. For home cinema enthusiasts who are looking to duplicate the experience of a commercial Digital Cinema movie theater that uses the DCI-P3 color space approved by Disney, Sony, and Paramount, there are now LED powered projectors that are bright enough to enable the same experience in a typical home theater.

LENS

The BenQ marketing and support materials simply give the specifications of the type of lens used in the X1300. BenQ lists the lens as having a clear focus range of 1.73 - 4.33m @ Wide and 2.08 - 5.19 m at tele. In addition, the lens is an F=1.6 to f=1.75 and f19.16 to 23.02 mm.

Other than this, I can tell you that as I ran the projector through a range of tests from solid color to highly detailed scenes; test patterns and text slides; the image showed very little artifacts and distortion. Even excessive chromatic aberration related to the projector lens was minimal.. The lens has a 1:2x zoom ratio which is better than nothing. It doesn’t have any lens shift capability. The X1300i has a throw ratio of 1.3~1.56 100" @ 2.87m (100" @ 9.4ft). It gets the job done.

Throw Distance for a 16:9 Screen

X1300i-Throw-Chart

AUDIO SYSTEM

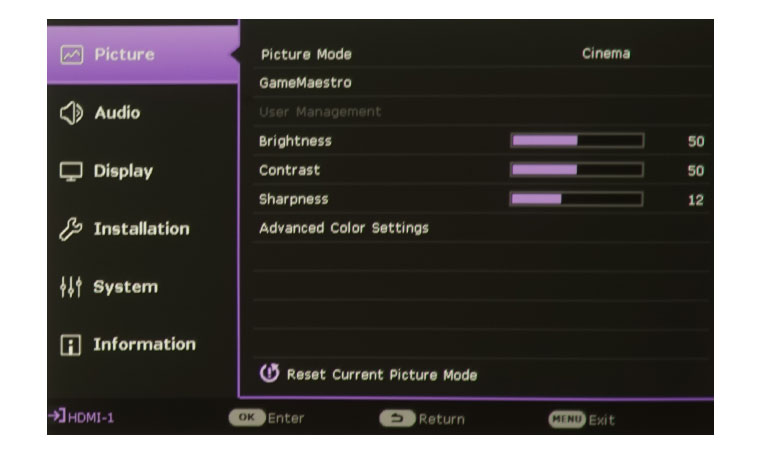
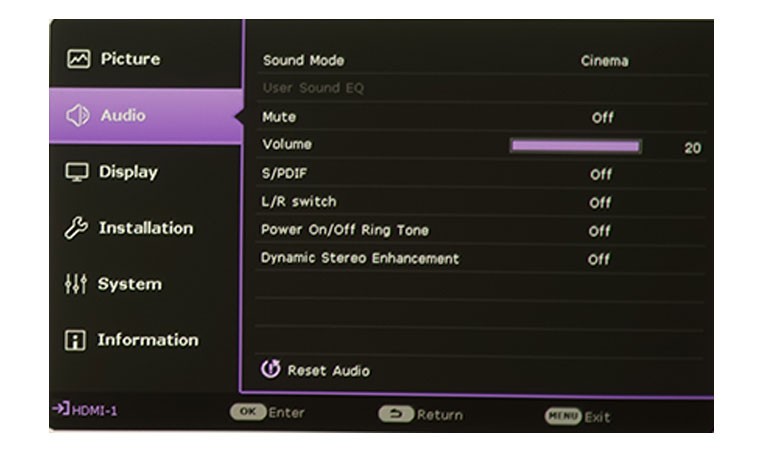
The BenQ X1300i uses a treVolo-tuned 5W x 2 virtual surround system. This set of stereo speakers uses what BenQ describes as “Acoustic and Psychoacoustic sciences” to balance game sound qualities.” BenQ adopted Bongiovi DPS technology which is designed to augment depth, clarity, definition, presence, and stereo field imaging. This technology makes the sound you hear when playing games, watching movies, or listening to music, amazing.

This isn’t the first projector that BenQ has treVolo-tuned, but, for the X1300i, Bongiovi DPS technology uses a patented algorithm with 120 calibration points for real-time audio signal optimization. BenQ says, “Expect added depth, clarity, definition, presence, and enhanced stereo field imaging in real time.” Bongiovi DPS is also designed to generate reactive surround sound for different kinds of content. So does Bongiovi DPS breathe life into video games? Does it make music, and movies through the X1300i’s onboard speakers, external speakers, or headphones sound better?

When I first started testing the X1300i onboard audio system while listening to music, I was a little underwhelmed. I then pulled out one of my favorite 10-watt, stereo, Bluetooth speakers and immediately heard a noticeable difference. Even though both devices used the same size speakers and 10-watt amp, the stereo music on the projector had a wider stereo image. It didn’t have any more bass than my Bluetooth speaker, but, at maximum volume, there was no distortion. I couldn’t say the same for my favorite Bluetooth speaker. I was intrigued. I began going through some of my favorite action movies while not looking at the screen, only listening to the audio. I ran a couple of Dolby Atmos and DTS videos and WOW1 It was like the X1300i transformed into a sound imaging beast. I know these demos are designed to maximize audio effects, but you can’t argue with results. I went through demo video after demo video and was continually impressed. BenQ has added preset Sound Modes,which can be accessed through the BenQ menu system including a User mode that allows me to personalize elements of the sound settings, as well as adjust the levels according to my preference. For this type of content I enjoyed playing with the User settings, but, honestly, the Cinema mode was my preference.

Ok, so the demo videos sounded great, but their content is designed toward exaggerated sound. How would actual movies sound?I started “The Last Jedi” and went to the scenes where Rey and Kylo are connected by the force. These scenes are not “bang bang, whoosh” scenes. For the most part, they’re quiet and subtle. Wow! Did the Cinema modes audio tuning go to work! The exaggerated audio effects when Rey and Kylo made a force connection were so much greater than even my television’s really good speakers ever produced. Instead of just a reverb effect, I could clearly discrete the little details in the enhanced stereo image going from left to right and right to left, as the two actors spoke to each other. I kept looking away from the screen at the back of this little projector just four feet in front of me in amazement.

Next, was “Iron Man.” The opening scene of the movie where Tony Stark's Humvee gets attacked by the Ten Rings is another of my favorite scenes. I heard this movie through a Dolby Atmos system, so I wasn’t expecting THAT experience, but what the X1300i gave me was impressive. Sound in the inside of the vehicle was subdued and claustrophobic, as you would expect it to be in an enclosed metal vehicle. When the first soldier opened the door, subtle sounds from the extreme right and left suddenly appeared. Then, the door closed and the sounds contracted again. When Tony stepped out of the vehicle to flee, the world just rushed in. Bullets began impacting and ricocheting; small rocks and pebbles began flying;then in came the Stark Industries bomb and...it was very acoustically enjoyable. Movie after movie, I enjoyed the companion audio.

Games. The X1300i has three dedicated gaming modes for FPS, RPG and FPG. I loaded up “The Last of Us, Part 2” and put the unit in Game Mode. BenQ elected to make the mid range sounds enhanced with reduced low-end. I could hear sounds more clearly as Ellie moved through a house looking for supplies and then was attacked. The fight scene was really enhanced by the audio experience. I’m not a rabid gamer, but I really liked the way BenQ tried to take in which elements of the sound could benefit me in an FPS in this type of game. Obviously, not all FPS games will sound best in this mode. In fact, when I moved to Cinema sound, the missing bottom end appeared, and, even though it was only mid bass, it was very effective. Little things really enhanced the game play; such as at the end of the scene, when Ellie opened a garage door to find a bow and arrow target range. As the door opened, I swear I heard it open above me, along with every little piece of dust and dirt that fell onto the ground. Keep in mind that along with the sound, there are also video enhancements designed to make game play better (see top of the review). RPG and SPG focus more on audio than visual enhancement. Although, when I loaded up “Madden” on my PlayStation, the colors of the stadium and the players popped, and it was nice to hear the crowd around me.

There’s no doubt about it, the BenQ X1300i stand-alone sound system is an excellent example of attention to detail with rewarding focus on improved very specific, more common, Gaming and Entertainment experiences. So, does it make music, and movies through the X1300i’s onboard speakers and headphones sound better? Yes, it does.

CONTROL PANEL

The X1300i Control Panel is located on the right side of the projector (looking from the rear) near the top. The usual Power button (Press once to power on; press twice to power down) is located farthest to the right.

Directly to the right of the Power button is the Source selection button. Below are the Navigation controls, consisting of four arrow keys in a round formation. The Enter button (labeled “OK”) is found in the middle of them. Disappointingly, the arrow keys do nothing when you aren’t in the menu system unlike BenQ projectors like the X1300i where the up and down arrows let you adjust Keystone correction, while the left and right arrows control Volume Down and Up, respectively.

That leaves only the three buttons at the bottom. The middle button is the Menu button, while the one to the left of Menu is the Back button. When pressed, it takes you back up one level in the menu system. To the right of the Menu button is the Eco Blank button, which shuts off the projected image, thereby reducing power consumption.

INPUTS AND CONNECTORS

This BenQ X1300i has all the necessary inputs and connectors needed on a home theater projector, including a pair of HDMIs, both being HDMI 2.0 with HDCP 2.2. copy projection.
Even though the X1300i is a 1080p projector, the HDMI inputs accept a 4K HDR signal and will convert content to 1080p.

There is one Type A USB for PC-free presentations and more, using the built-in media player which supports a range of video and audio codecs, as well as still images formats including JPEGs, BMP and PNG.

Interestingly, there are no typical stereo mini audio inputs.  However, audio can come into the projector, and then output to the internal speakers or to the stereo audio output.  In addition, both HDMI inputs carry audio, with audio coming through the media player as well.  All of those can be sent to the speakers or the audio output.

Having a 12 volt trigger for a motorized screen (or other uses) gives those of you looking for a motorized screen the ability to have the screen lower or go up automatically, when the

BenQ X1300i is powered up.  Shut off the projector and the properly equipped screen will roll up automatically.

There are two internal connections that you should be aware of. On page 8 of your user manual, you will see how to remove the top of the X1300i to expose the internal HDMI input 3 port. This port is designed specifically to house the included BenQ QA01 streaming media stick that supplies your Android TV OS, Chromecast compatible functions and the receiving of wirelessly cast (thrown) content from compatible devices like phones, tablets and personal computers. There is also a hardwired USB Micro - B power cable

External Connectors

  • HDMI input 1 port (Version 2.0b) HDCP 2.2
  • HDMI input 2 port (Version 2.0b) HDCP 2.2 with Audio Return
  • USB 2.0 Type-A port (2.5 A power supply, Firmware upgrade)
  • Audio Out (mini jack)
  • Audio Out (S/PDIF) Optical digital audio output – Toslink
  • DC 12V Trigger (3.5mm Jack)
  • RS-232 control port
  • Kensington anti-theft lock slot
  • IR Receiver (Front + Back)

Internal Connectors

  • HDMI input 3 port (Version 2.0b) HDCP 2.2 (See manual Page 8)
  • USB 2.0 Micro - B Cable (2.5 A power supply - See manual Page 8)

REMOTE CONTROL

The remote control for the BenQ X1300i is lightweight and white in color, making it easy to see even in a darkened room. It’s a combination remote that controls both the projector’s functions, as well as the dedicated AndroidTV OS in the included QS01 HDMI Streaming Stick. It has all the buttons needed to quickly access inputs and adjustments that would be used when watching content at home. The remote features quick access buttons for Music settings, Game modes, casting, source select and Amazon Prime Video. One unique button on the remote is the Google Assistant that works just like on your smartphone. There are also two separated buttons for activating the X1300i projector menus and the BenQ QS01 AndroidTV menus.

MENUS

The BenQ X1300i has three sets of menus: Quick Install, Basic and Advanced. On the X1300i, there is only one dual remote control. This is different from other BenQ projectors like the TK850i. The Quick Install menu runs after first start-up, or if the projector has been set back to factory settings. Quick Install is for settings and adjustments normally used during initial setup, including test patterns, keystone correction, and install position (ceiling, table, etc.).

The quick start menu will only run once, providing you’ve completed the basic setup, as well as the QS01 installation into HDMI 3 located under the top of the projector. Otherwise, the menu will appear after each Power On cycle.
The photo below shows the Basic Menu, which gives access to many of the basic functions you may need during day-to-day operation.

More detailed settings used for initial setup and image fine tuning are available via the Advanced Menu. Images below are shots of the Advanced Menu.

Latest Reviews

February 25, 2024

Introducing the Hisense C1: A cube-shaped 4K UHD lifestyle projector with an RGB triple laser light source and integrated JBL ...

February 19, 2024

The BenQ X3100i is a 4LED, 4K UHD (3,840 x 2,160p) 0.65" DLP short-throw gaming projector that offers a BenQ-rated ...

© 2024 Projector Reviews

crossmenu linkedin facebook pinterest youtube rss twitter instagram facebook-blank rss-blank linkedin-blank pinterest youtube twitter instagram